
Getting started
01Installation and first run
- 1 Run the installer you received and follow its steps.
- 2 Open the program from its desktop icon.
- 3 On the first run only, the program sets up its database by itself. Wait until the login screen appears.
The program runs without internet: all your data stays on your own machine, not on an outside server. If the factory has an internal network, several machines can work on the same data — contact technical support to set it up.
This guide follows the order in which you will actually use the program. In sales, sections 3, 4 and 6 are your daily work; if you own the factory, add 8, 12 and 13.
02Logging in and changing the password
The first login uses the username admin and the password you received from technical support.

The program makes you change the password on first login, and that is deliberate: the default password is known, so leaving it means anyone who opens your computer gets into all of the factory’s data.
Your first 10 minutes: before entering real data, run the whole cycle on a small example.
- 1 Enter your factory’s name, phone and address in the settings — they appear at the top of every order sheet (section 12).
- 2 Add one product type and one product under it (section 5).
- 3 Add one customer (section 4).
- 4 Create a test order and print its sheet (section 6). That way you have seen the whole cycle before any real data goes in.
Daily work
03The home screen and late orders
The first screen you see is “Home”, and it lists the orders not yet delivered — not every order. That is deliberate: finished work doesn’t need to sit in front of you every morning.
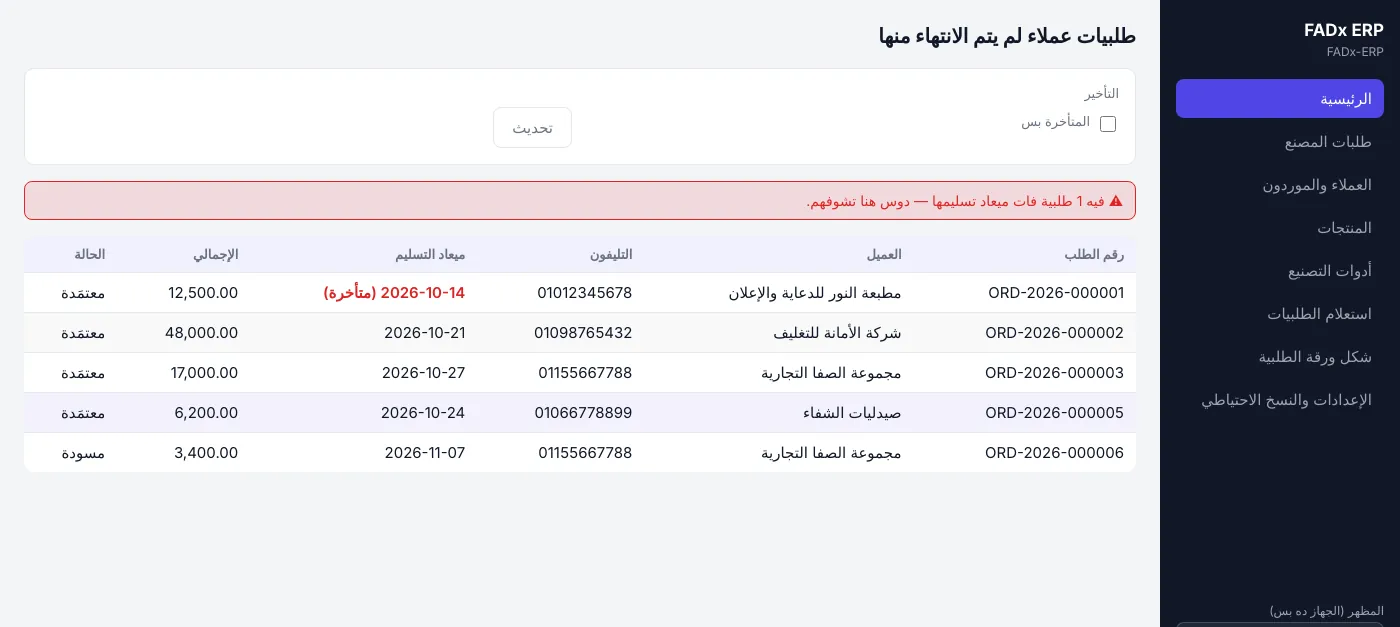
Late orders: any order past its delivery date shows that date in red with “(late)” next to it, and an alert above the table gives the count. Click the alert, or tick “Late only”, to see just those orders.
For the alert to work, always set a delivery date when you create an order. Without one, the program has no way of knowing the order is late.
| Column | What it shows |
|---|---|
| Order no. | Generated automatically and never repeated |
| Customer and phone | So you can call the customer without opening another screen |
| Delivery date | Turns red once it has passed |
| Total | The agreed amount |
| Status | Worked out from the order’s stages (see section 6) |
04Customers, suppliers and statements
In FADx Print one party can be a customer and a supplier at the same time — common in printing, where a workshop buys from you and also does your binding.
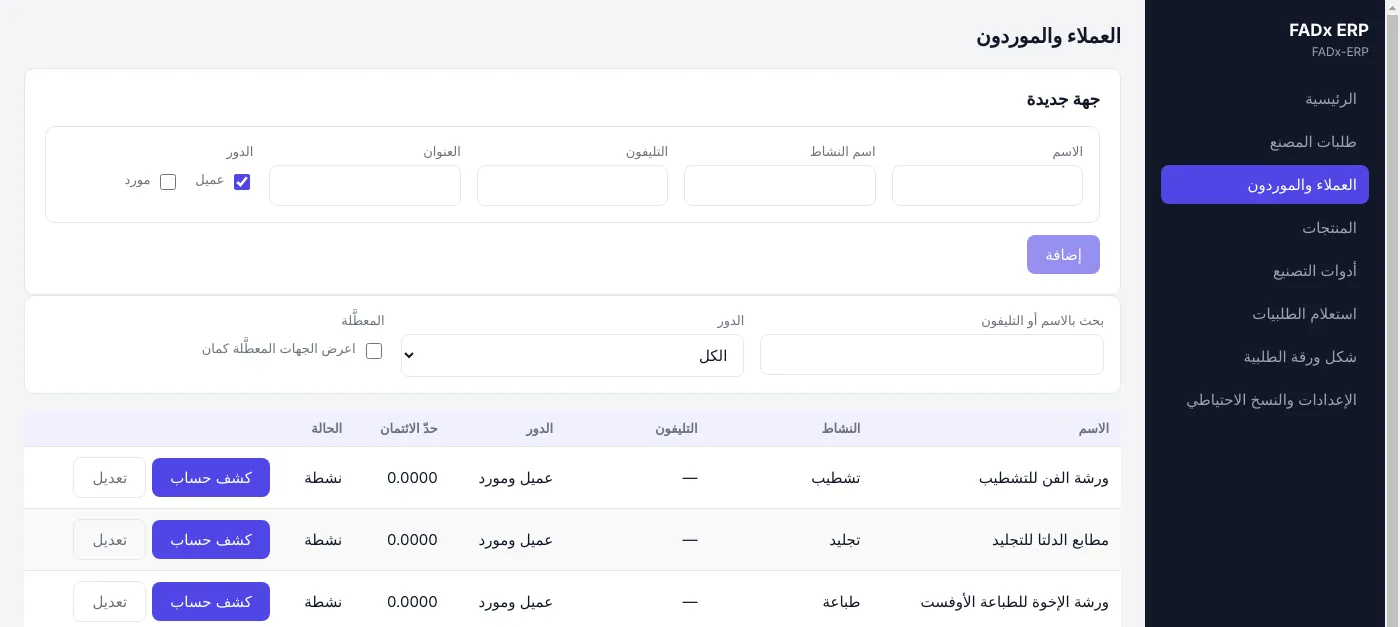
- 1 On the “Customers & suppliers” screen, fill in the name, phone and line of business in the “New party” form.
- 2 Under “Role”, tick “Customer” or “Supplier” — or both.
- 3 Click “Add”.
Statements: open the party and choose “Statement”, and you must pick the role. As a customer, it shows what they owe you for their orders; as a supplier, what is due to them for stage costs.
The role is required on purpose: a party that is both customer and supplier has two entirely separate statements, and treating them as one would give you a wrong figure without you noticing.
Credit limit: you can set a maximum for each customer, and the program uses it to warn you when that customer’s balance goes over it.
05Products and product types
Before you can create an order, you need products to choose from. Products are grouped into types — boxes and cards, promotional print, office stationery… whatever fits your work.
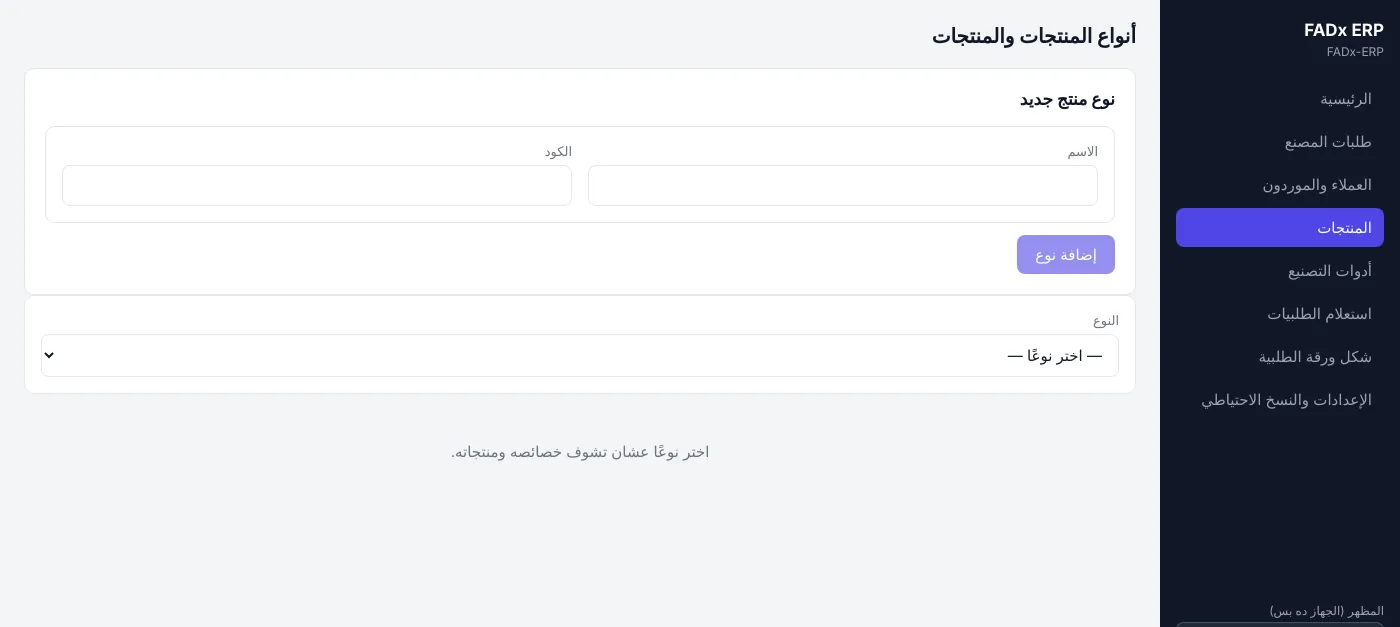
Do it in this order:
- 1 Create the type first — say “Boxes and cards” — in the “New product type” form, then click “Add type”.
- 2 Pick the type from the “Type” list to see its properties and products, and add any properties you need: size, paper stock, number of colours. These then appear on every product under that type.
- 3 Create the product — say “Printed carton box” — under that type.
Start simple. You can add properties at any time; piling on types and properties from day one only makes entering orders slower for no gain.
06The full order cycle
This is the heart of the program. An order moves through “Draft” → “Approved” → “Waiting” → “In progress” → “Completed”. Its status is worked out from the status of its stages — nobody sets it by hand, so it can’t be wrong.
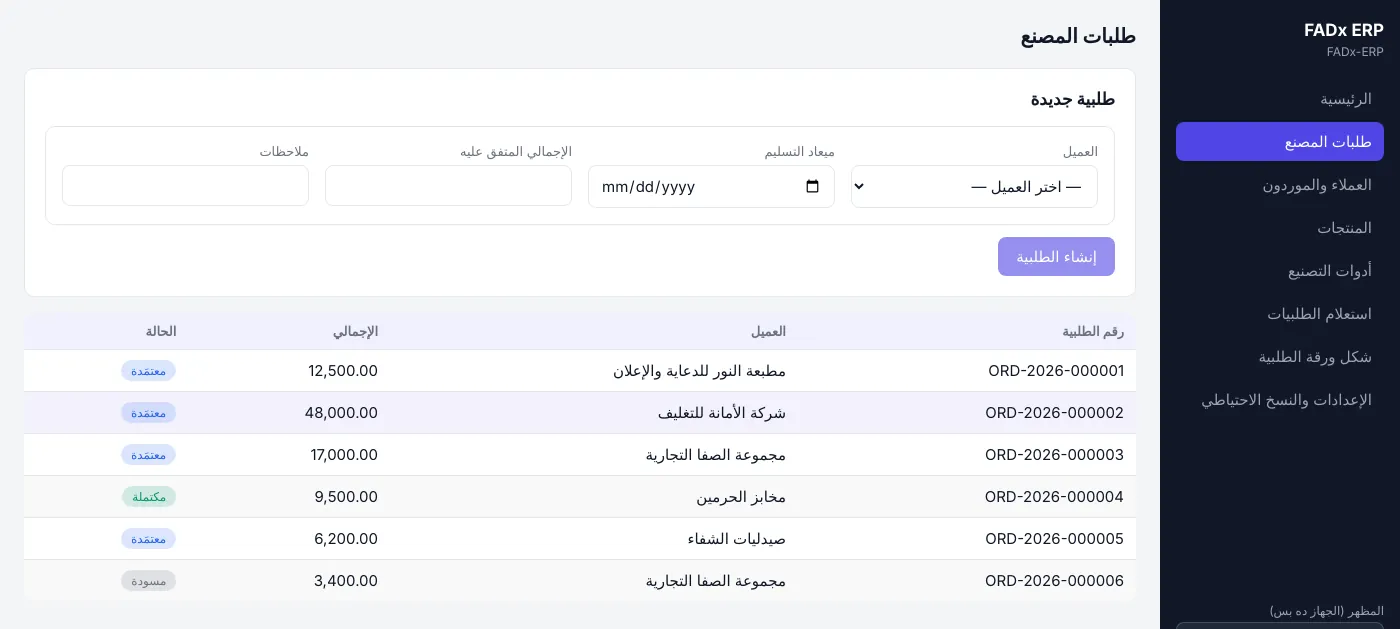
Creating the order: on the “Factory orders” screen, in the “New order” form:
- 1 Choose the “Customer”.
- 2 Set the “Delivery date” — this is what drives the late-order alert.
- 3 Enter the “Agreed total” if you have agreed one. If not yet, leave it blank and add it later.
- 4 Click “Create order”.
Adding items: open the order and add its items — product and quantity. Each item is handled on its own, with its own stages and costs.
Approval: click “Approve”. Until then the order is a “Draft” and can be edited freely.
Production stages: for each item, add the stages it will go through, in order — printing, binding, finishing… For each stage you can set the supplier who will do it.
- 1 Open the item from inside the order.
- 2 Choose the “Stage type” and the “Supplier”, and set where it falls in the sequence.
- 3 Click “Add stage”.
Moving a stage: every stage passes through three statuses, and you move it along with its status button.
| Stage status | Meaning |
|---|---|
| Waiting | Defined but not started |
| In progress | Sent out to the supplier |
| Completed | Back and finished |
As soon as every stage of every item is completed, the order becomes “Completed” by itself.
No jumping backwards at random: the program only allows logical moves, so the record keeps telling what really happened.
Printing the order sheet: inside the order, click “Print order sheet”. The program produces a PDF with the order’s details, items and stages, laid out in your factory’s style (see section 11).
This sheet travels with the job through the factory and goes to the customer. Print it, or send it to them on WhatsApp straight away.
Cancelling an order: if an order is called off, click “Cancel” and give the reason. The program keeps it on record instead of deleting it, so the figures stay right.
07Stage costs and supplier payments
Every stage done outside the factory is recorded with its cost and supplier — that is how the program knows what an order cost you.
Adding a cost:
- 1 Open the stage and choose “Stage costs”.
- 2 Enter the “Amount”, pick the “Supplier” and add a short description.
- 3 Click “Add”. The cost is now a “Draft”.
Posting: a draft cost has no accounting effect at all. Once you have confirmed it, click “Post” — the program then creates the journal entry and records the amount as payable to the supplier.
Why two steps? So you can record an estimate while you wait for the supplier’s invoice without touching your accounts, and post it once the figure is final.
Paying the supplier:
- 1 On a posted cost, click “Pay”.
- 2 Enter the amount and pick the cash box you are paying from.
- 3 Part payments are allowed; the program keeps track of what is left.
Overpayment is refused: try to pay more than is due and the program says no and shows you the correct balance, so you never pay twice by mistake.
08Order profit
Every order’s details include a row showing “Revenue”, “Posted cost” and “Profit”.
| Figure | What it means |
|---|---|
| Revenue | The amount agreed with the customer |
| Posted cost | The total of stage costs actually posted |
| Draft cost | Shown only when some costs are not posted yet |
| Profit | Revenue minus posted cost |
| After drafts | The profit if every draft were posted; shown only when drafts exist |
An order whose price is not agreed yet shows “Not agreed yet”, not zero. Zero minus the costs would show a “loss” that isn’t real — a number that could push you into a wrong call on profitable work.
Putting it to use: compare the profit on orders of the same kind for the same customer. If one made much less, a stage in it probably cost more than usual — open its stage costs and compare.
09Production tools
This is where you track what each customer has left in your keeping — zinc plates, printing plates, paper — sorted by the stage they belong to. It answers a question that comes up every day: is that customer’s plate still here, or is it worn out?
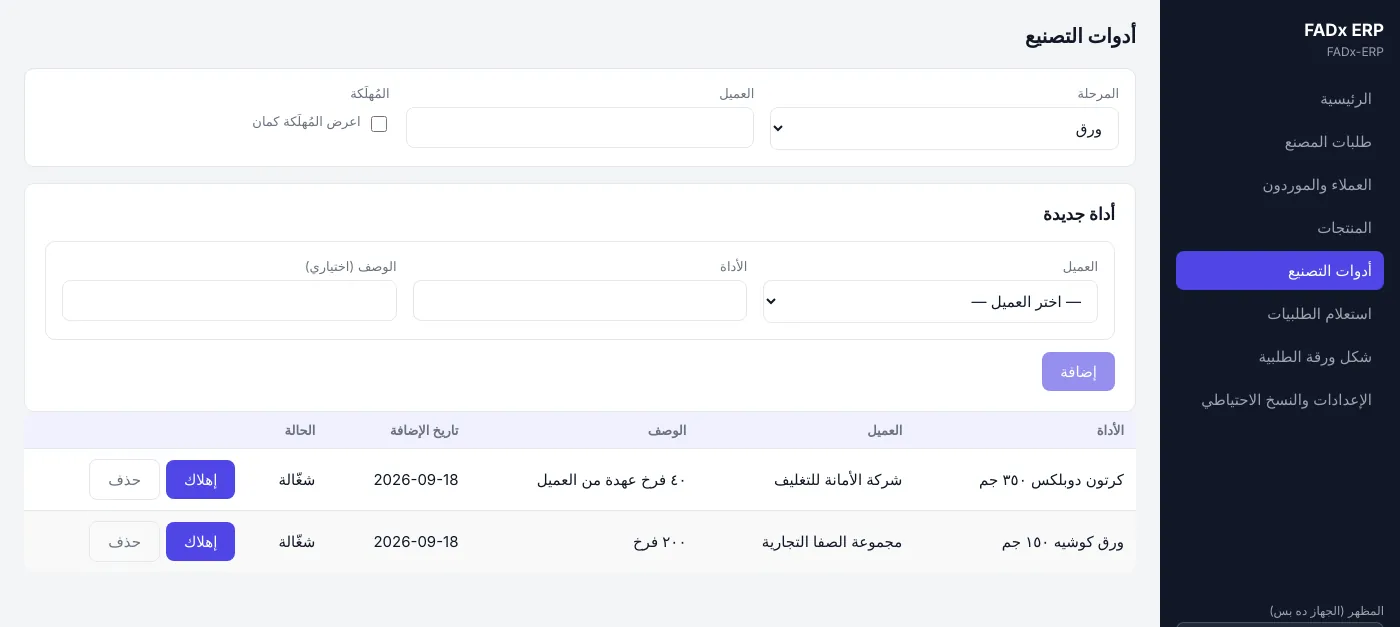
To add a tool, in the “New tool” form pick the “Customer”, enter the “Tool” and an optional “Description”, then click “Add”. To find one, filter the list by “Stage” or “Customer”, and tick “Show retired too” to include retired tools.
Two buttons, one important difference: “Retire” means the tool is worn out but its record stays, so you know it existed and when it left. “Delete” removes it for good — use it only for a tool entered by mistake.
10Order lookup
To search every order — not just the open ones — use the “Order lookup” screen. You can filter by customer, status, date or order number.
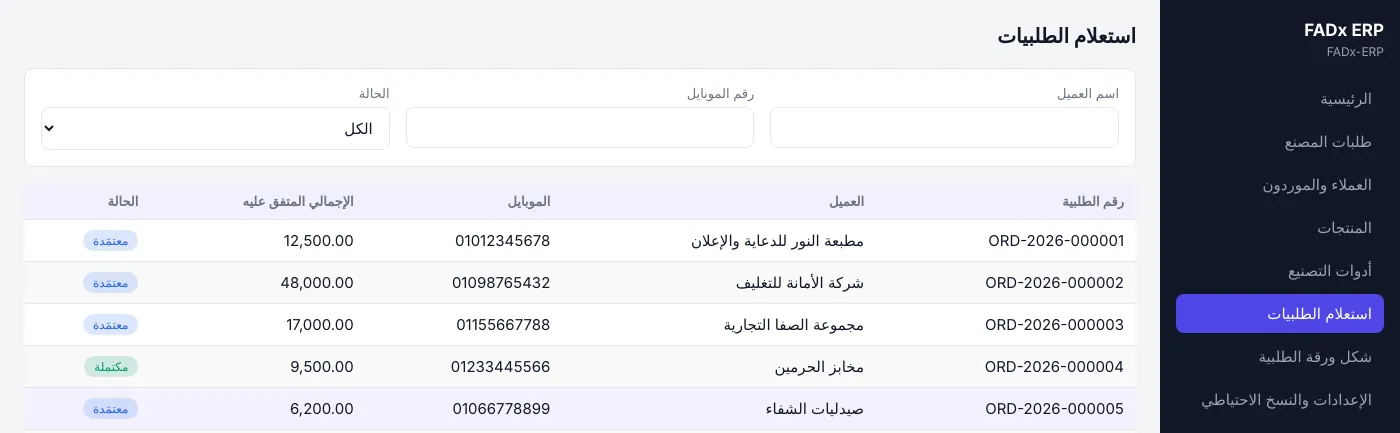
A customer asking about an order from two months ago? Type their name here and you will see all their orders, and where each one stands, in a second.
Administration
11The order sheet layout
The sheet you print and hand to the customer takes its look from you: your logo, your colours, your wording.
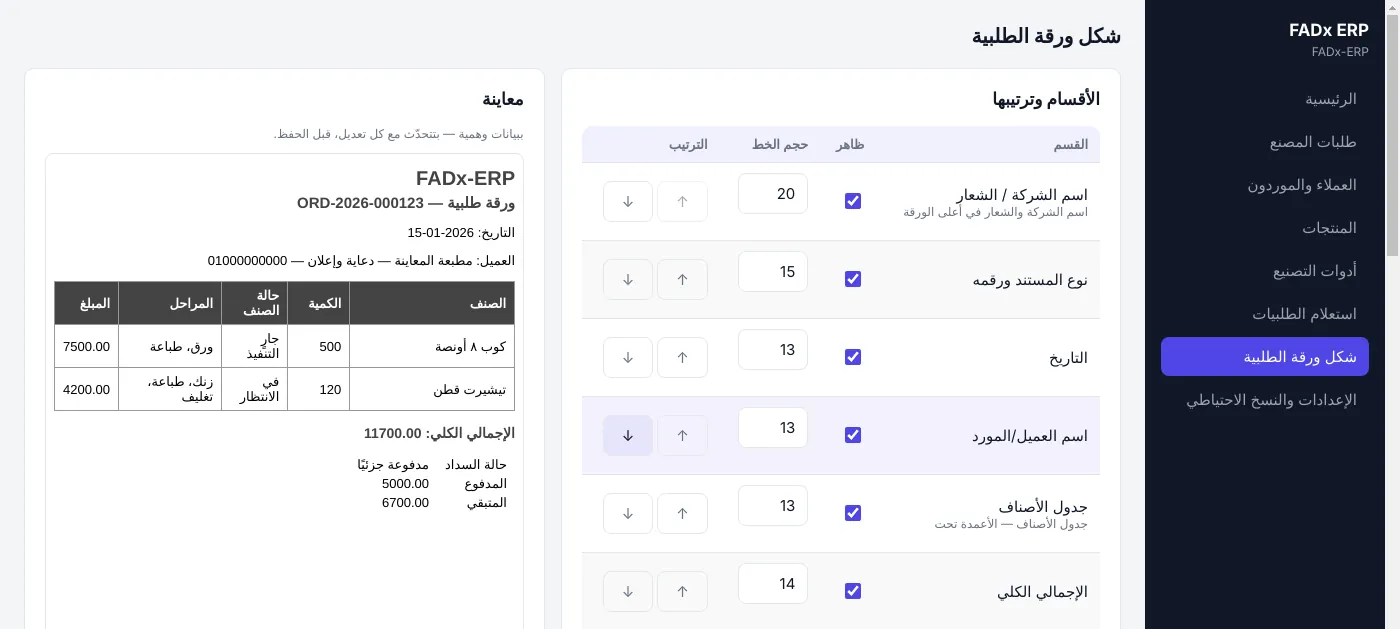
What you can change:
- Logo — upload an image and set its width and height in millimetres.
- Section order — move any section up or down with the arrows.
- Show or hide any section.
- Font size for each section separately.
- The sheet’s main colour.
- Column names and labels — call them whatever your factory calls them.
- Closing text — terms, or a thank-you, at the foot of the sheet.
The preview updates with every change, before you save — so experiment freely. Nothing changes on printed sheets until you click “Save design”.
Print a test sheet after any big change. The screen is very close to paper, but the real print has the final word.
12Settings and appearance
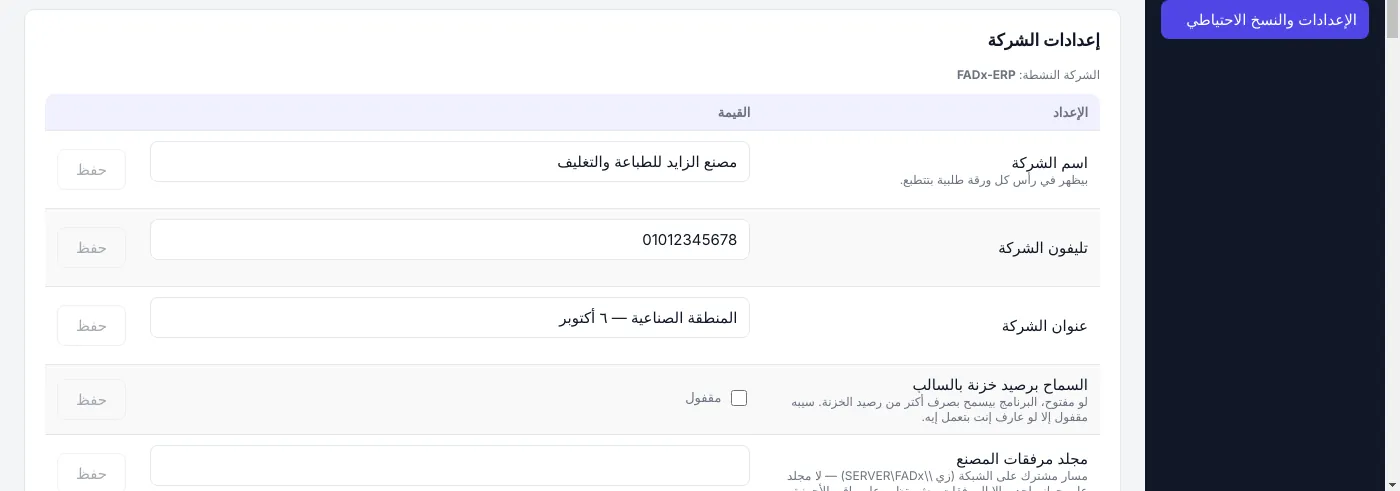
Company settings are under “Settings & backup”, and each setting is saved on its own with the “Save” button beside it.
- “Company name” — shown at the top of every order sheet.
- “Company phone” and “Company address”.
- “Factory attachments folder” — where stage photos and documents are kept.
If more than one machine works on the same data, the attachments folder must be a network path (such as \\SERVER\FADx). A folder on a single machine means the other machines won’t see the attachments.
Appearance — and an important difference. Two places control how the program looks, and each reaches a different set of people. The second is “Appearance (this device only)” at the bottom of the sidebar.
| Where | Who it affects |
|---|---|
| The settings screen | Every user on the same company; needs admin permission |
| The sidebar | This device only; any employee can change it without permission |
The options are dark or light mode, font size, and element size (buttons and spacing). The two places are independent of each other.
Someone on a machine whose eyes are tired? They can enlarge the text from the sidebar on their own device only, without enlarging it for everyone.
13Backups
This is the most important page in the guide. A factory that loses its database loses every order and every customer account — nothing else in the program carries the same consequences.
Automatic backup: the program takes a copy by itself on startup whenever the last good backup is older than the set interval (1 day by default). You don’t need to do anything.
| Setting | Default |
|---|---|
| Automatic backup | On |
| Every how many days | 1 |
| Copies kept | 14 (the oldest are deleted automatically) |
Manual backup: click “Make a backup” at any time — especially before anything big, such as an update, a large batch of data entry, or trying something new.
Check it is working: above the button, a line shows how many days have passed since the last successful backup. It turns red once that goes past a week.
If you see “Failed” in the log, don’t ignore it. The two usual causes are a full disk or a configured attachments folder that doesn’t exist. Fix the cause, then take a manual backup to make sure.
Keep copies off the machine. A backup on the same computer that could be stolen or catch fire is not a backup. Move copies to an external drive or cloud storage from time to time.
14Multiple companies
You can run more than one factory or branch on the same program. Each company is a completely separate database — its own orders, customers and accounts, with no overlap at all.
- 1 In “Settings → Companies”, type the new company’s name and click “Create company”.
- 2 The company is created without being opened, so setting one up to try things out doesn’t move everyone onto it.
- 3 When it is ready, click “Open” beside it and confirm.
Opening another company restarts the program and asks you to log in again. No data is lost, but any work left open on another screen is — so save first.
15Permissions and users
Each employee has a user account and a role, and the role decides which screens they see. A sales employee won’t even find the settings screen in the sidebar.
This is not just hiding things from view: even if someone tries to reach something they are not allowed by another route, the program refuses. And every sensitive action is logged with who did it and when.
Create a user for each employee instead of everyone sharing one account — only then does the log mean anything.
Help
16Common problems
| Problem | What to do |
|---|---|
| The program won’t open | Close it completely from Task Manager and open it again. If it keeps happening, contact support and send a screenshot of the error message |
| I forgot my password | A user with admin permission can reset it. If there is none, contact support |
| An order isn’t on “Home” | “Home” only shows unfinished orders. Look it up in “Order lookup” |
| A payment was refused as an overpayment | You are trying to pay the supplier more than is due. Check the correct balance on the cost itself |
| Profit shows “—” | The order has no agreed price. Add the total and the profit will be calculated |
| Attachments don’t show on another machine | The attachments folder is set to a local path. Change it to a network path (section 12) |
| A backup “Failed” | Usually a full disk or a missing attachments folder. Fix it and take a manual backup |
| The text is too small to read | Enlarge it from the sidebar — the change applies to your device only |
Still need help? Email technical support at info@fadx.ae, or call our nearest office in the UAE, Saudi Arabia or Egypt.
Still need help?
Send us your question and we will reply with the steps.