
For admins & HR
01Introduction
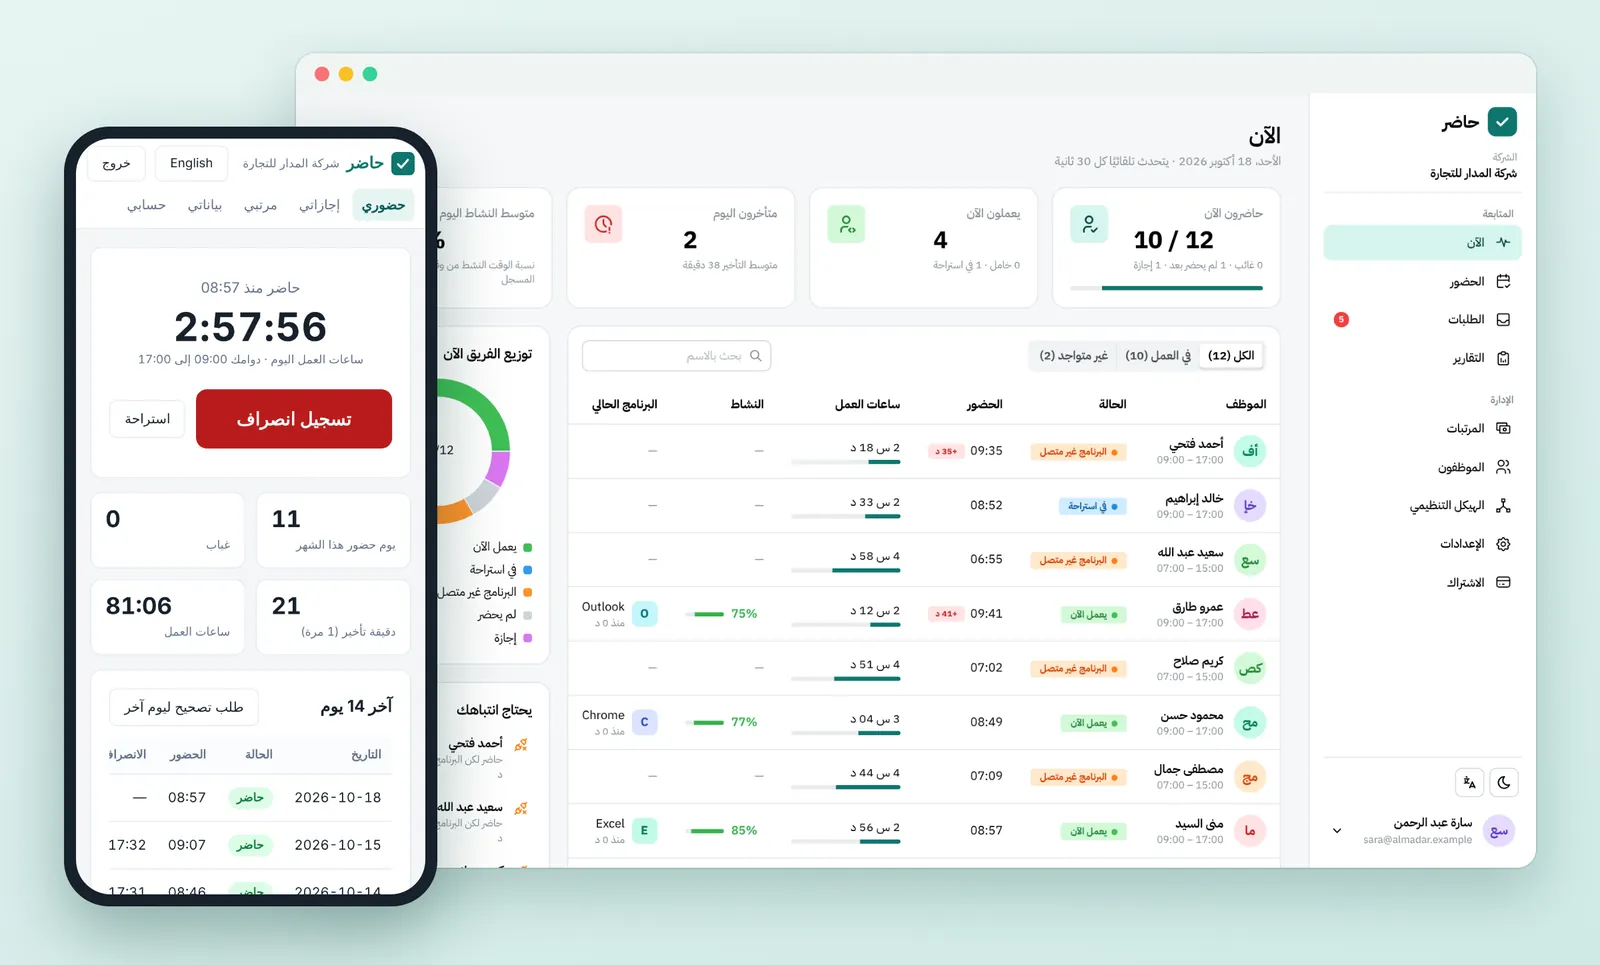
Hader is a cloud system for attendance and payroll, built for companies in Egypt and Saudi Arabia. Employees check in from a browser, the desktop app or a fingerprint terminal; admins follow, approve and pay from one place.
It has four parts, all on one account:
| Part | For | What it does |
|---|---|---|
| Hader website (browser or phone) | Employees and admins | Check-in, requests, follow-up, settings, reports |
| Desktop app (Windows) | Employees who work on a computer | Check-in, plus activity and screenshots if the company turns them on |
| HR app (Windows) | Admins and the HR team | The admin screens in a dedicated desktop app |
| Fingerprint terminal (ZKTeco) | Employees at the office or plant | Punches reach Hader and become attendance |
The guide has two parts — one for admins and HR, one for employees — followed by an FAQ and contact details. Every name and number in the screenshots belongs to a demo company.
02Getting started: from sign-up to day one
Five steps take you from sign-up to the first day of attendance, and the “Getting started” card on the home page tracks what you have done. You run the company from the Hader website, or from the HR app on Windows or in a browser at /hr/. Some settings — roles, branches, structure, fingerprint terminals and single sign-on — are only in the HR app.
- 1 Register the company: on the Hader website choose “New company” and enter the company name, your name, your email and a password. A free trial starts at once, and you become the company admin with every permission.
- 2 Set the general settings in “Settings”: the company time zone (one for everyone, even people working from another country), working hours, the grace period before lateness counts, the weekly days off, the deduction policy for absence, lateness and overtime, and what the desktop app records (activity, app and window names, screenshots) and how long screenshots are kept.
- 3 Add shifts and holidays: a shift for people with different hours, including a night shift that runs into the next day, then the year’s public holidays.
- 4 Add branches (optional): for each one, a name, address and a point on the map (paste the full Google Maps link), a radius of 20 to 5,000 metres, and the office network if there is one. Then choose what happens to a check-in from outside the area (table below).
- 5 Add your employees and their salaries as in the next section, then ask one of them to check in from a browser or phone.
| Check-in from outside the area | What happens |
|---|---|
| “Allowed, then reviewed” (default) | It is recorded and goes to the direct manager or HR to approve or reject |
| “Refused” | It is not recorded, and the employee sees the distance and the reason |
| “No check” | For a branch not set up yet |
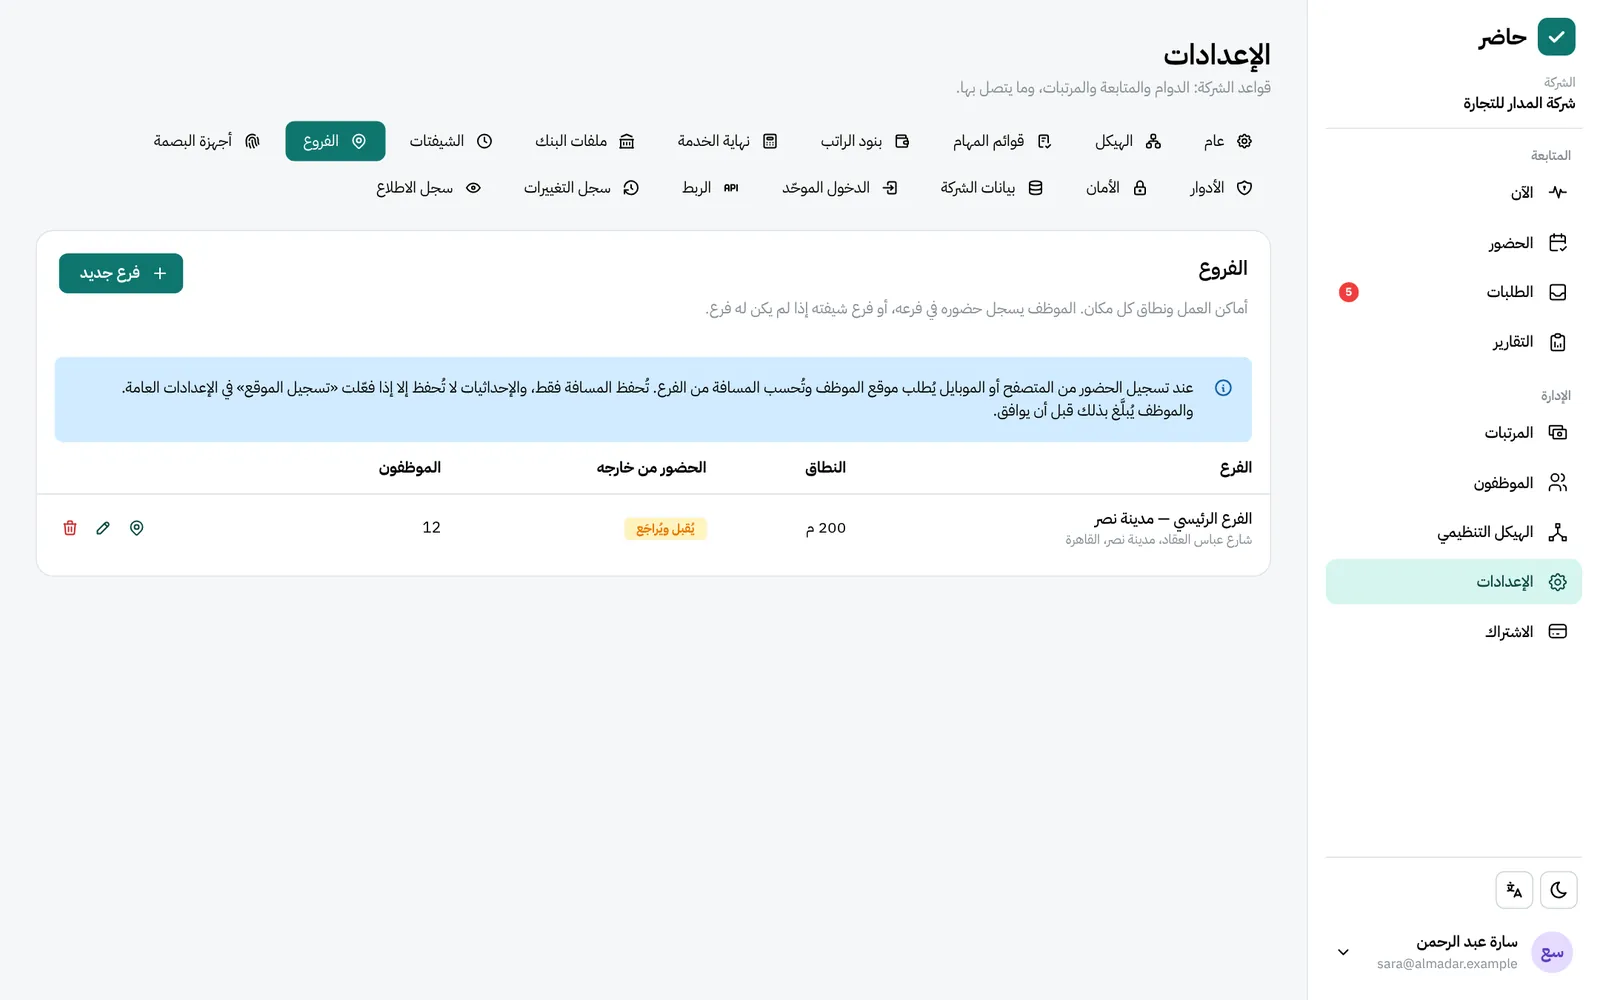
An employee with no branch can check in from anywhere (remote work). Hader keeps only the distance from the branch and the result; it keeps coordinates only if “Location recording” is on in Settings.
03Adding employees and contract types
Add employees one at a time, or all at once from an Excel file.
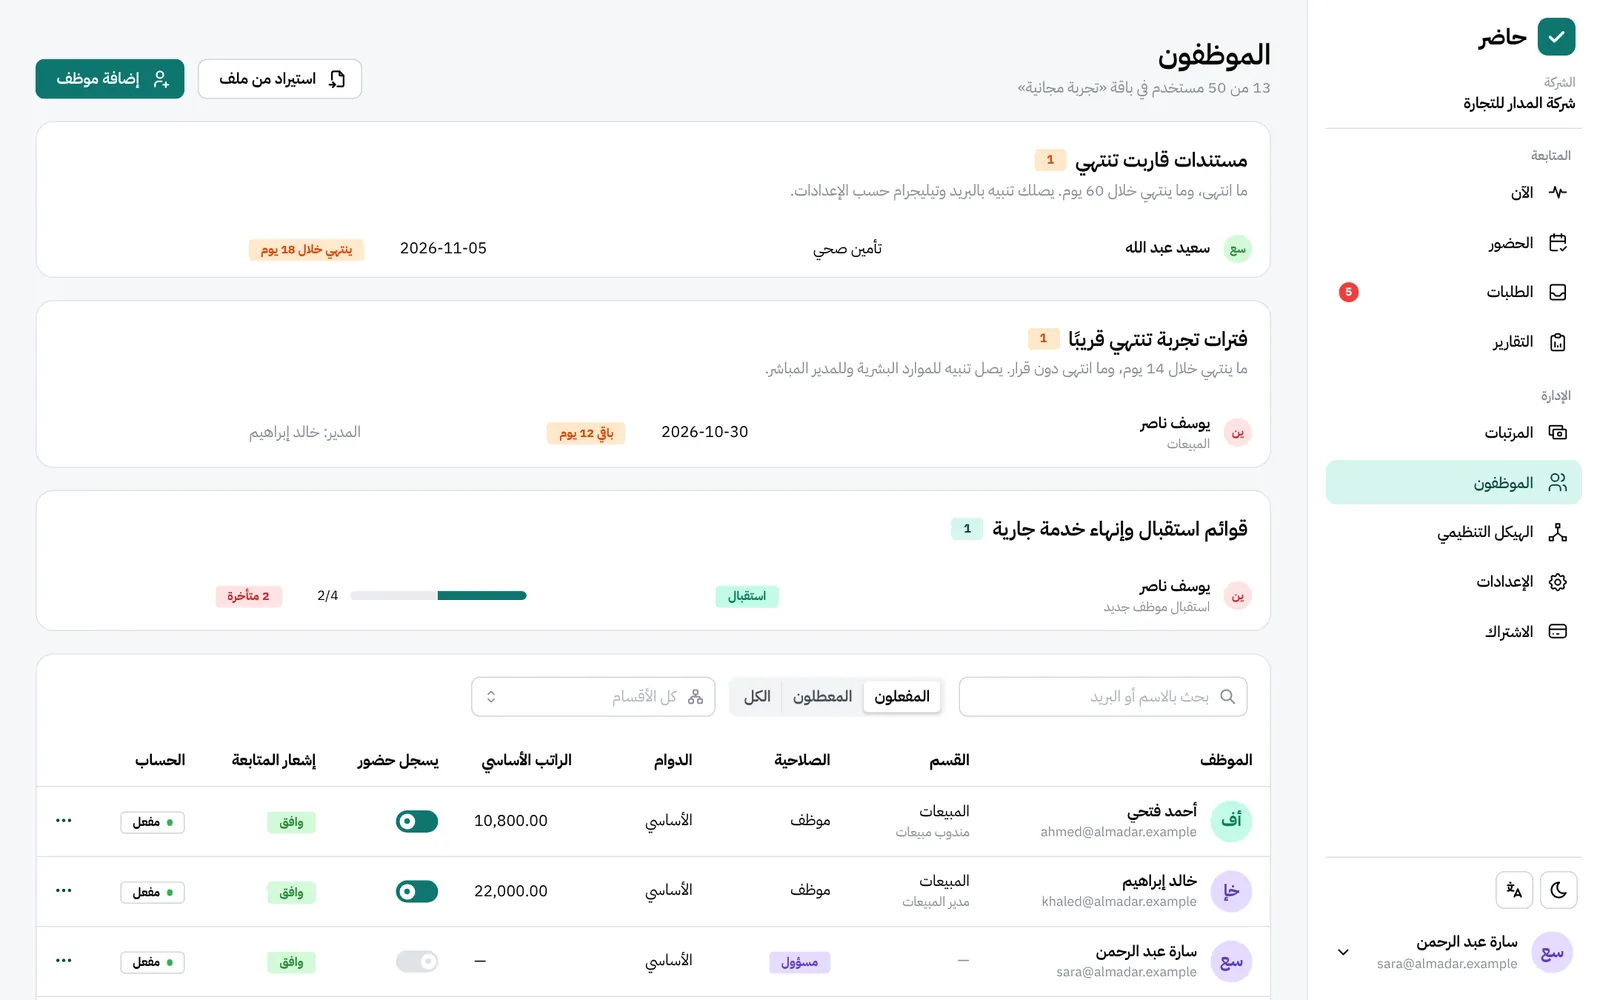
- One employee: from “Employees”, enter name, email and basic salary; optionally department, job title, direct manager, branch, shift, hire date, fingerprint PIN and bank details (bank, IBAN, national ID or iqama).
- Password: a temporary password the employee changes at first sign-in, or an email invitation where they choose their own.
- Import: an Excel or CSV file with name, email and basic salary, and optionally ID, bank and IBAN. Each employee gets a temporary password.
- Plan limit: no one can be added once your plan’s user count is full. Don’t delete people who leave; deactivate the account and their records stay.
- An admin who doesn’t clock in (the owner, say): untick “Tracks attendance” in their file, so they never show as absent or enter payroll.
| Contract type | How pay is worked out |
|---|---|
| Full time (default) | Monthly salary, with absence and lateness deducted by company policy |
| Part time | The same, on the hours of their shift, at the salary you enter |
| Temporary | Has an end date; no absence or pay after it, and a reminder before it ends |
| Hourly | Recorded working hours × hourly rate; no absence or lateness deductions |
A change of contract type takes effect from a date; days before it keep their old calculation.
04Structure, probation and documents
- Departments form a tree (Sales › Riyadh branch) and job titles are one company list, both in the HR app under Settings → “Structure”. The “Org chart” screen shows who reports to whom.
- The direct manager gets the team’s requests first, in “My team”; HR sees them too and can answer.
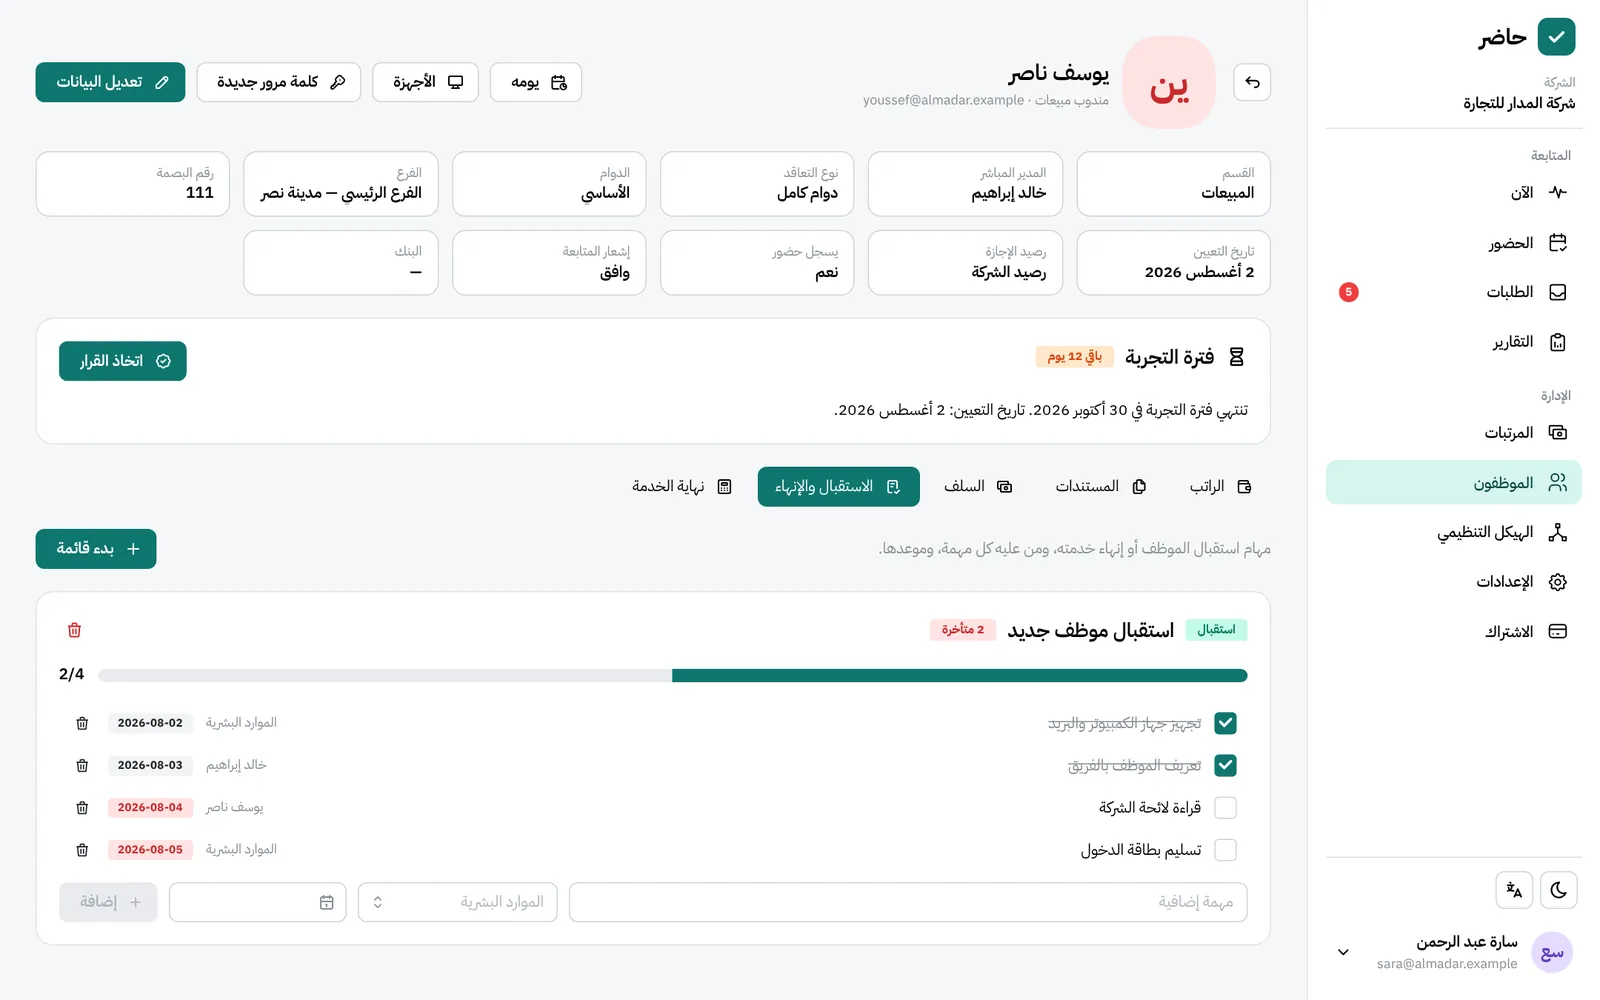
- Probation starts automatically for a new hire (90 days by default), with a reminder 14 days before it ends. Decide from the employee’s file: confirm, extend or end employment.
- Onboarding and offboarding checklists: task templates for HR, the manager or the employee, due a number of days from the hire date or the last working day. Everyone finds their tasks in “My tasks”.
- Documents: contract, ID, iqama, passport, licence and more, each with an expiry date. Reminders arrive 60, 30 and 7 days before expiry. Files are encrypted, and only admins and the document’s owner can open them.
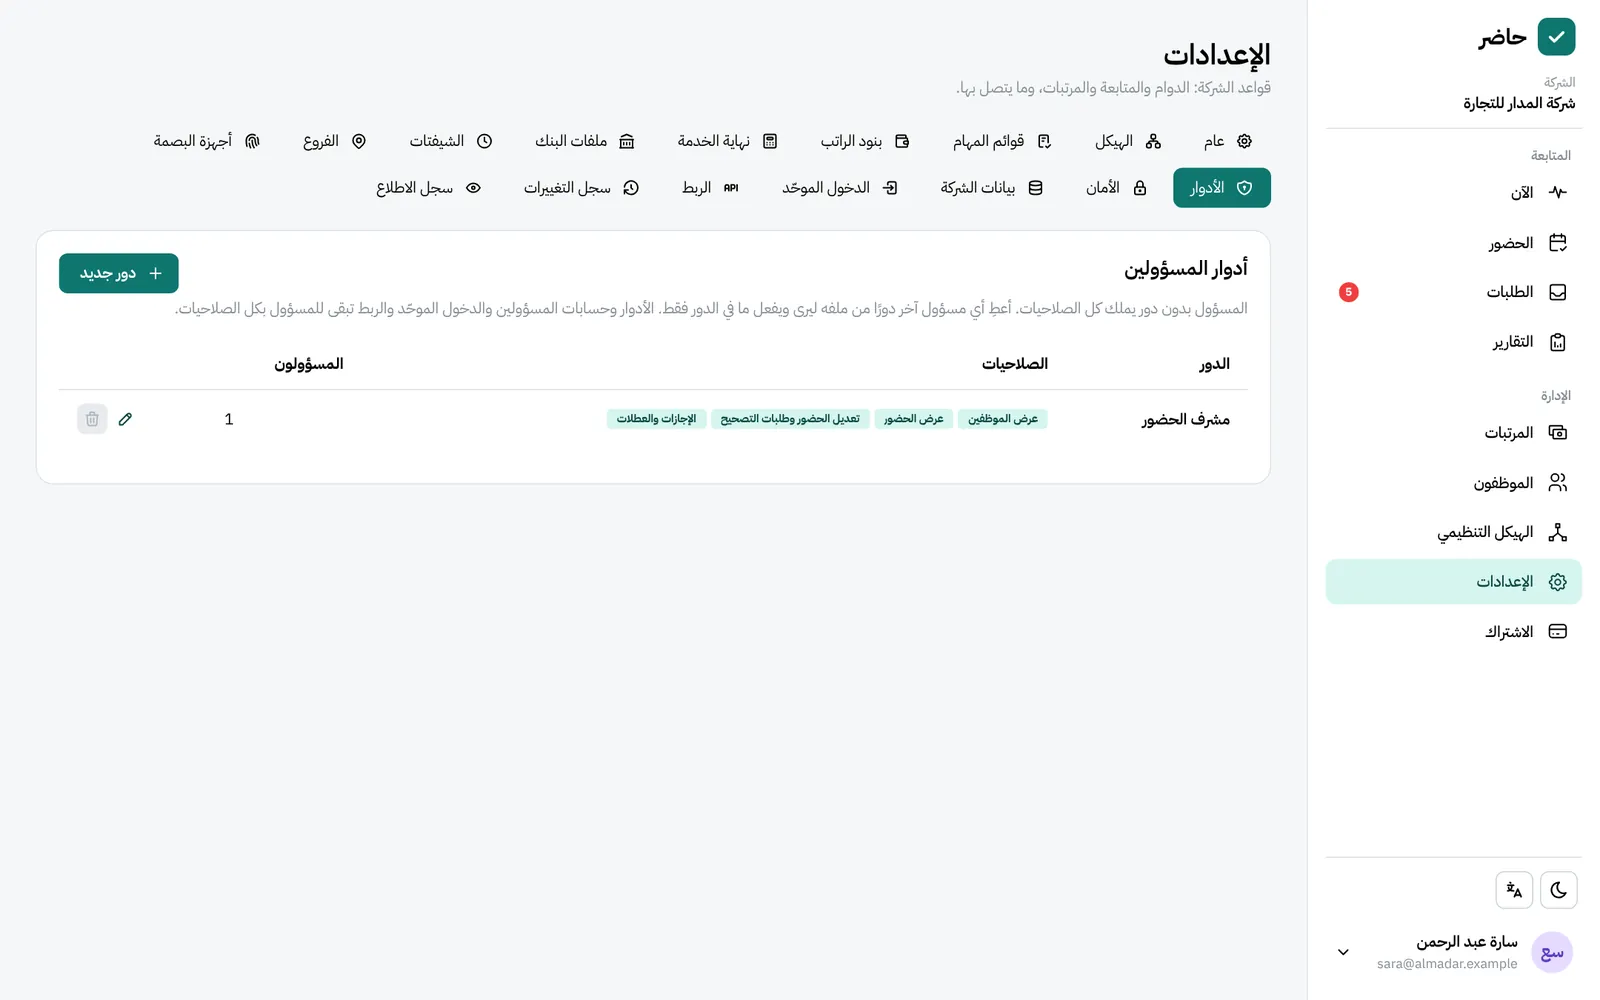
05Admin roles and permissions
An admin with no role has every permission. For any other admin, build a role in the HR app under Settings → “Roles”, then pick it in the admin’s file (“Admin role”).
A role is built from 13 permissions: view employees, add and edit them, documents, view attendance, edit it and correction requests, screenshots, leave and holidays, view payroll, edit it and approve the month, reports, settings, subscription, and the change log.
- Hader’s server enforces permissions itself, and a change applies at once.
- Without “view payroll” an admin sees no salary, bank or ID number on any screen.
- An admin with a role can’t change their own salary or attendance, or touch another admin’s account.
- Roles, admin accounts, single sign-on and integration keys are for full admins only.
06Following attendance
The “Live” page shows at a glance who is in, who is late and who is absent, and each employee’s day explains how it was counted.
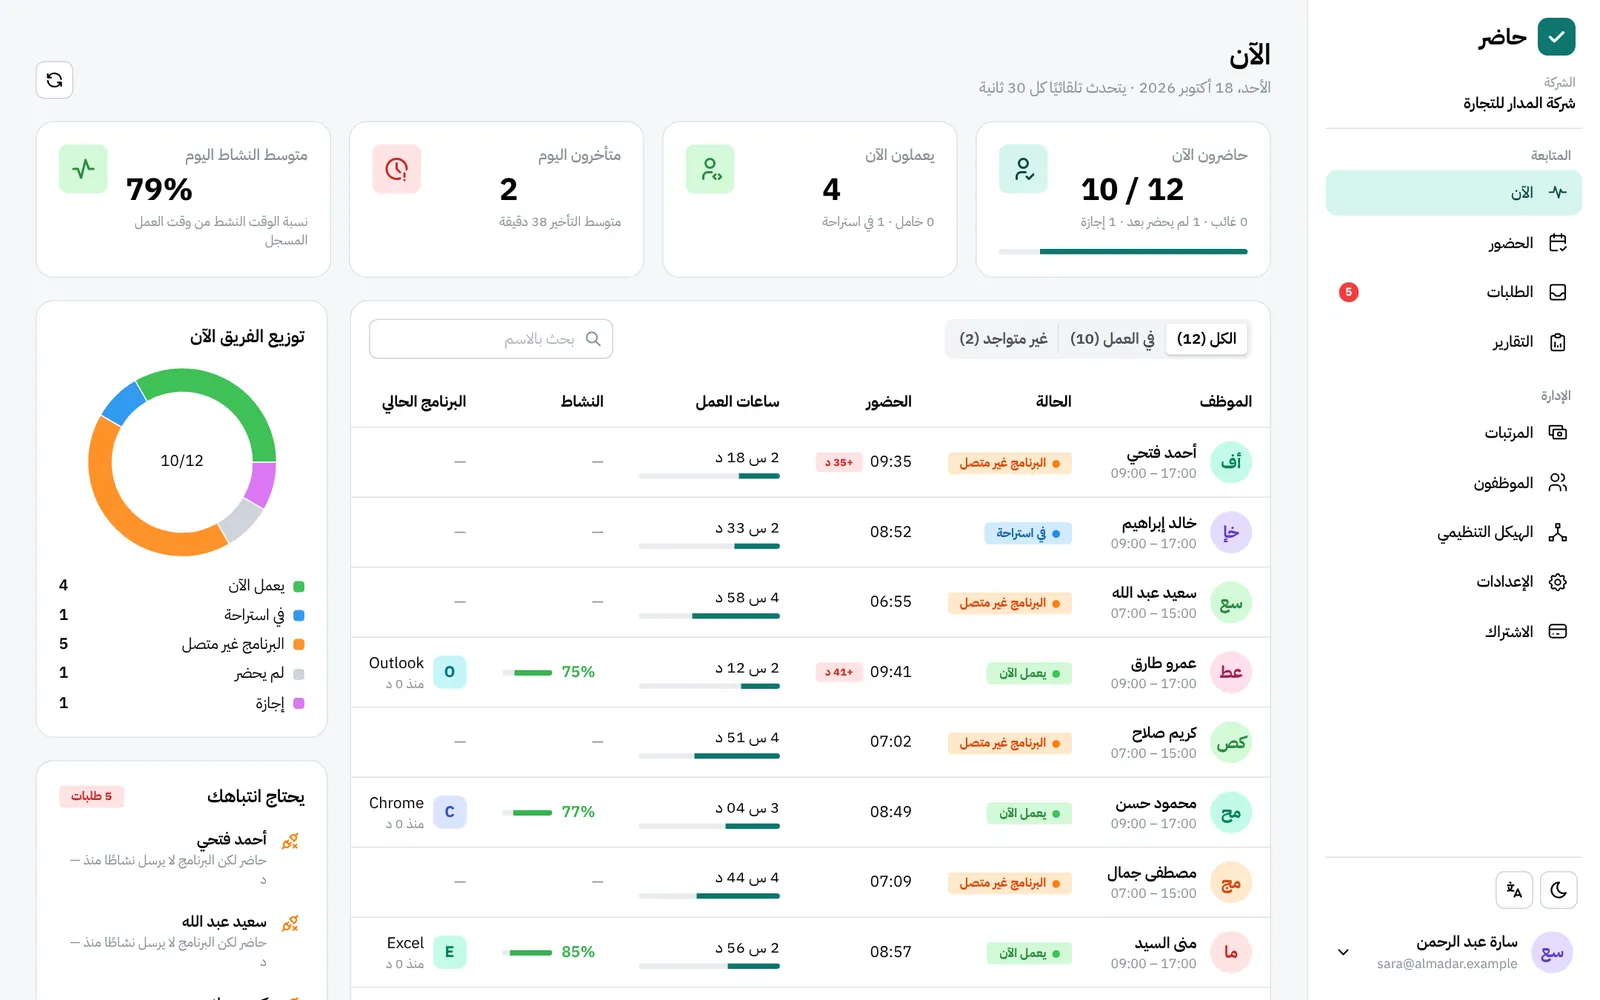
- “Live”: checked in, not in yet, absent, on leave, on a break, late, and average activity, with each count over the last 14 days. The HR app also shows whose desktop app is offline.
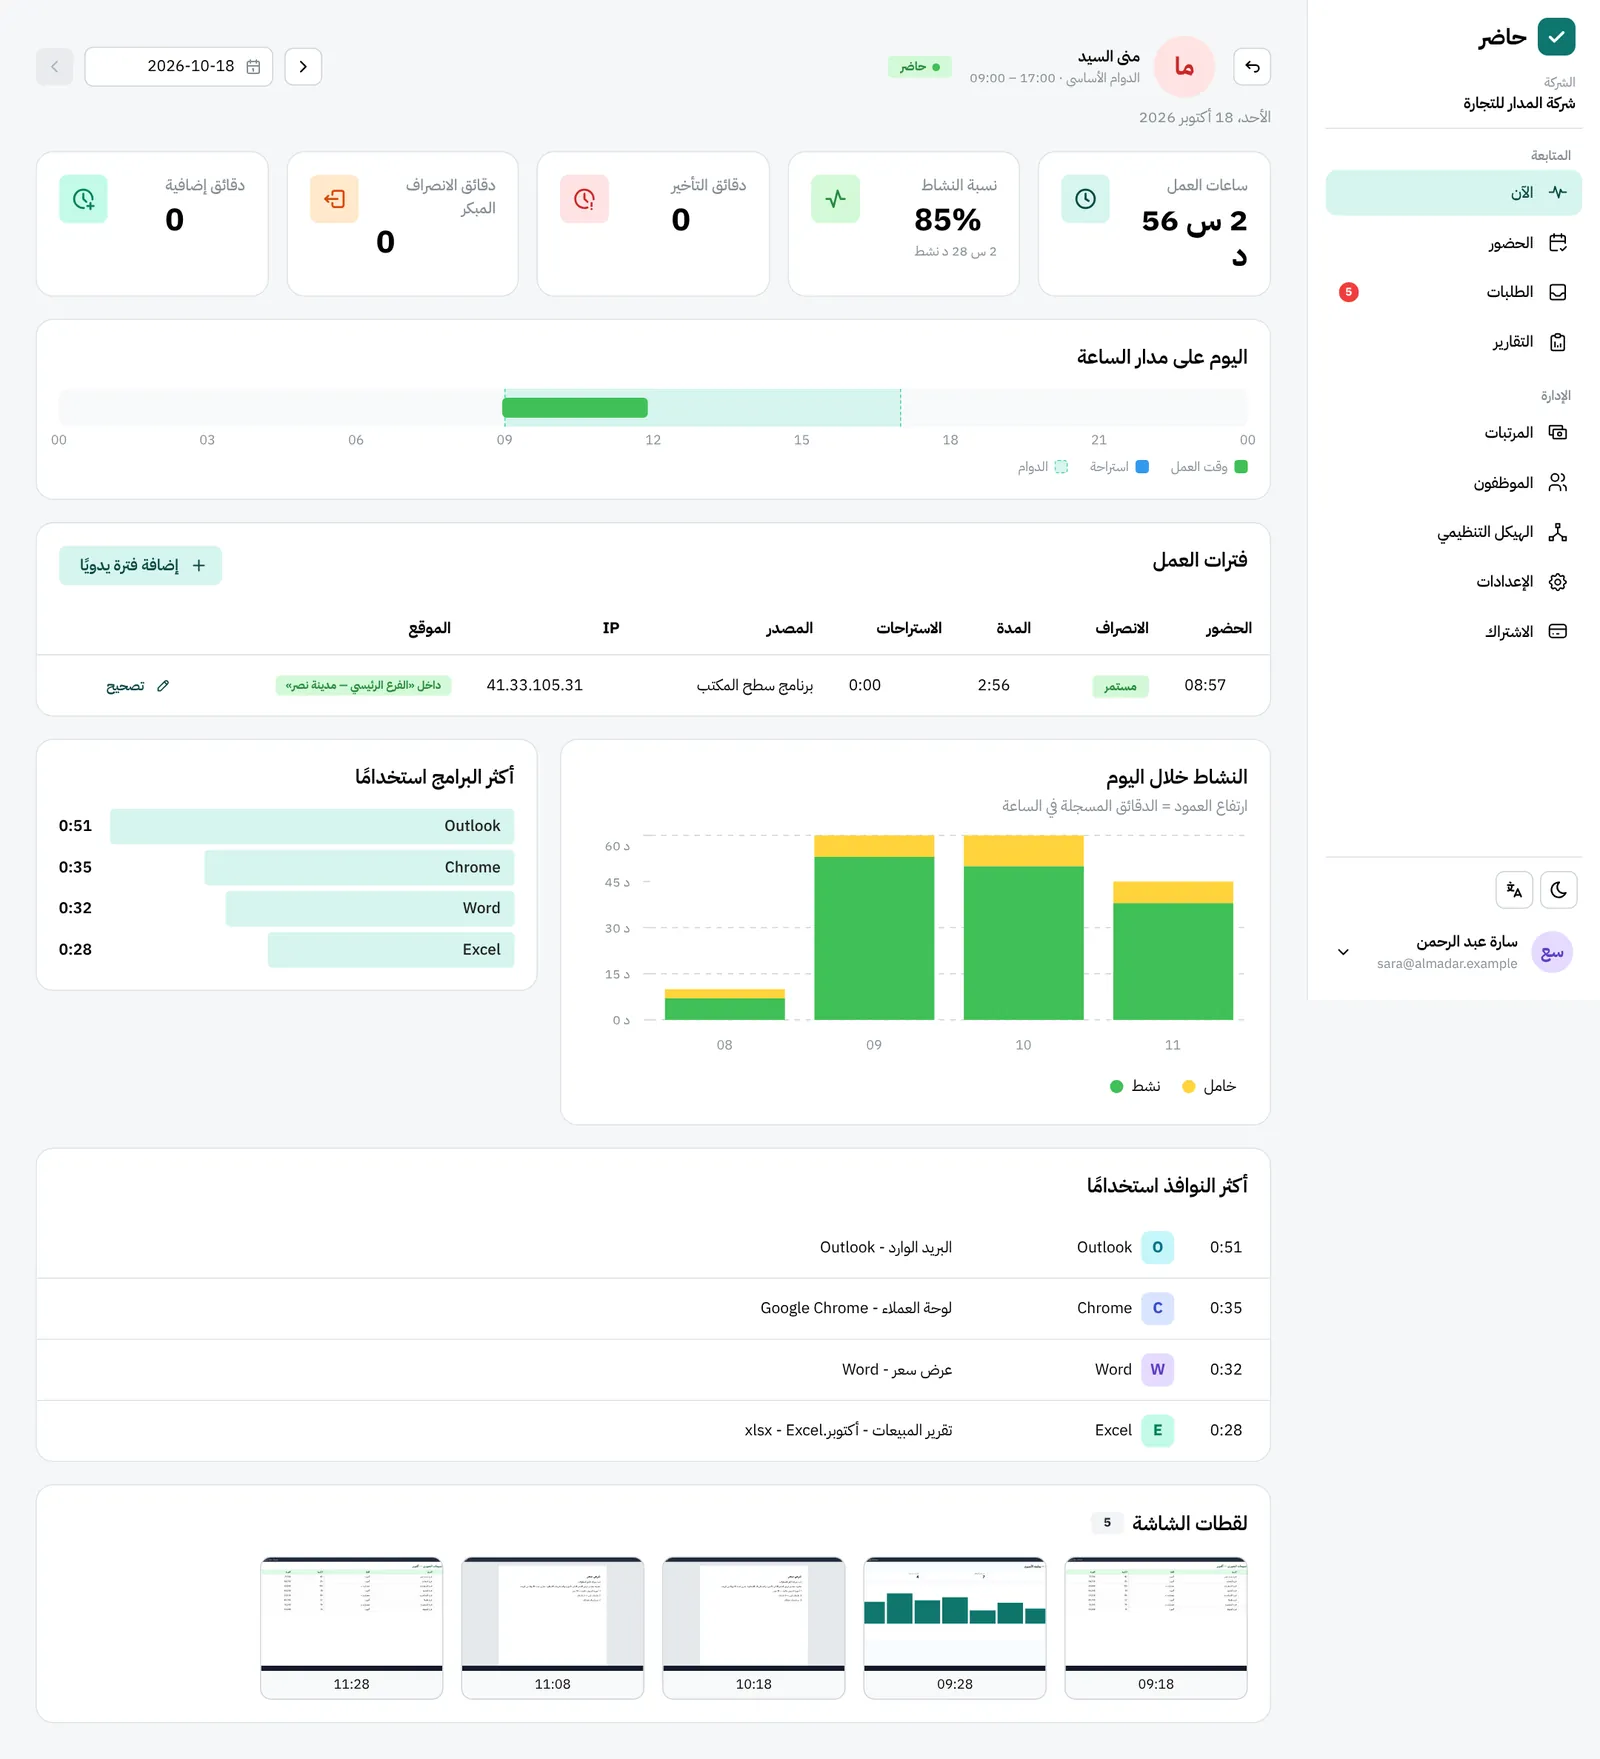
- An employee’s day: a timeline of check-ins and breaks, activity by hour, screenshots, and terminal punches as they arrived and how each was counted.
- Manual correction: from the employee’s day, add a session or change its time. Every change goes to the “Change log” with the old time.
- Correction requests: an employee who forgot to check in or out asks for a correction, and approval fixes the day automatically.
- Forgotten check-out: an open session closes by itself after 16 hours and is marked for review.
- Check-ins from outside the area: they appear under “Requests → Outside the area”. Approval keeps the check-in; rejection deletes it with its activity and screenshots, and the day counts as if it was never recorded.
For the whole month, “Attendance → Month summary” shows days present, absent and on leave, and late and overtime minutes for everyone, with an Excel export.
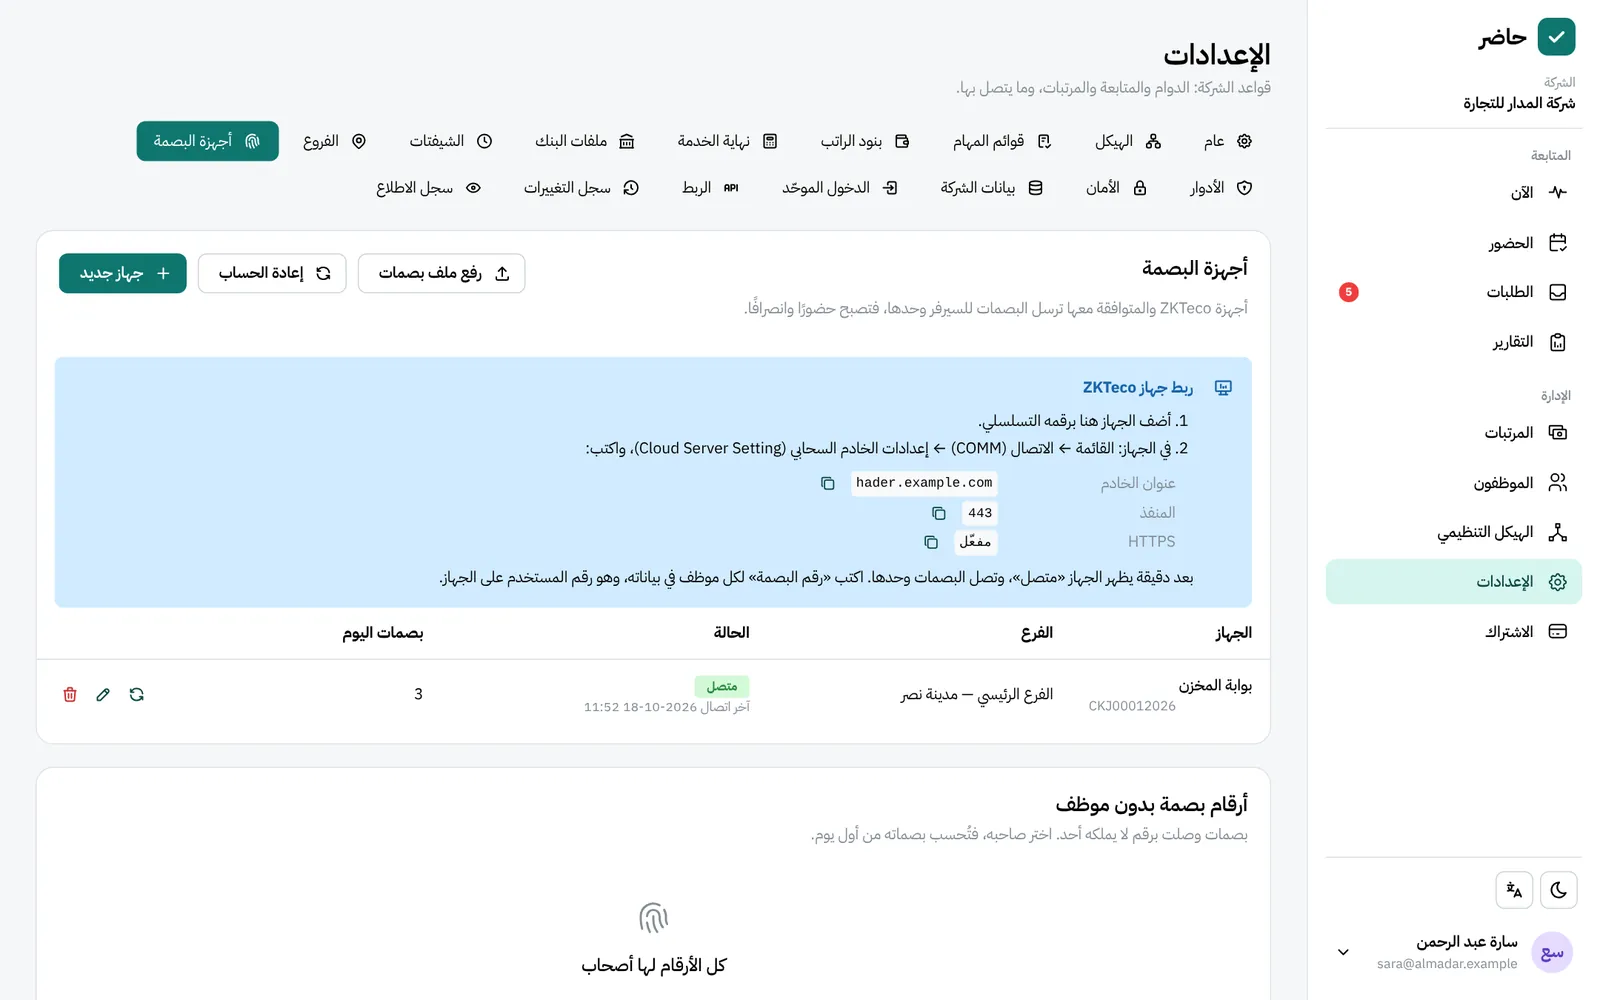
07Fingerprint terminals (ZKTeco)
ZKTeco and compatible terminals send punches to Hader on their own over the internet, with no software on an office computer.
- 1 In the HR app, open Settings → “Fingerprint terminals” and register the device by its serial number.
- 2 On the device: Menu → COMM → Cloud Server Setting, and enter the server address and port shown on the page.
- 3 The device’s first connection must come from the same internet connection you registered it from, within 24 hours. That proves the device is yours.
- 4 Enter each employee’s fingerprint PIN in their details: it is their user number on the device.
- For more security, tie the device to the office IP, so a connection from anywhere else is refused.
- Punches with a PIN no one has are kept under “Terminal PINs with no employee”. Choose the owner and they count from the first day.
- Incomplete cases (a check-in with no check-out, for example) appear under “Missing punches”.
- Two punches within two minutes count as one, and a punch at dawn belongs to the night shift that started before it.
- For terminals without internet, upload the USB file (attlog.dat) on the same page.
08Leave and requests
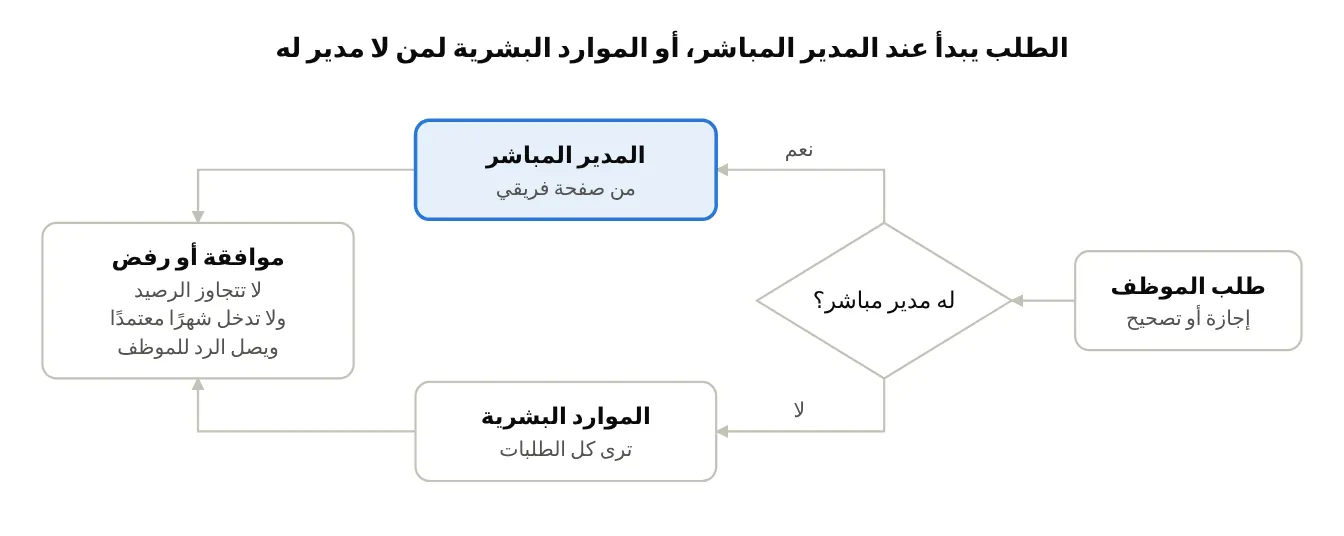
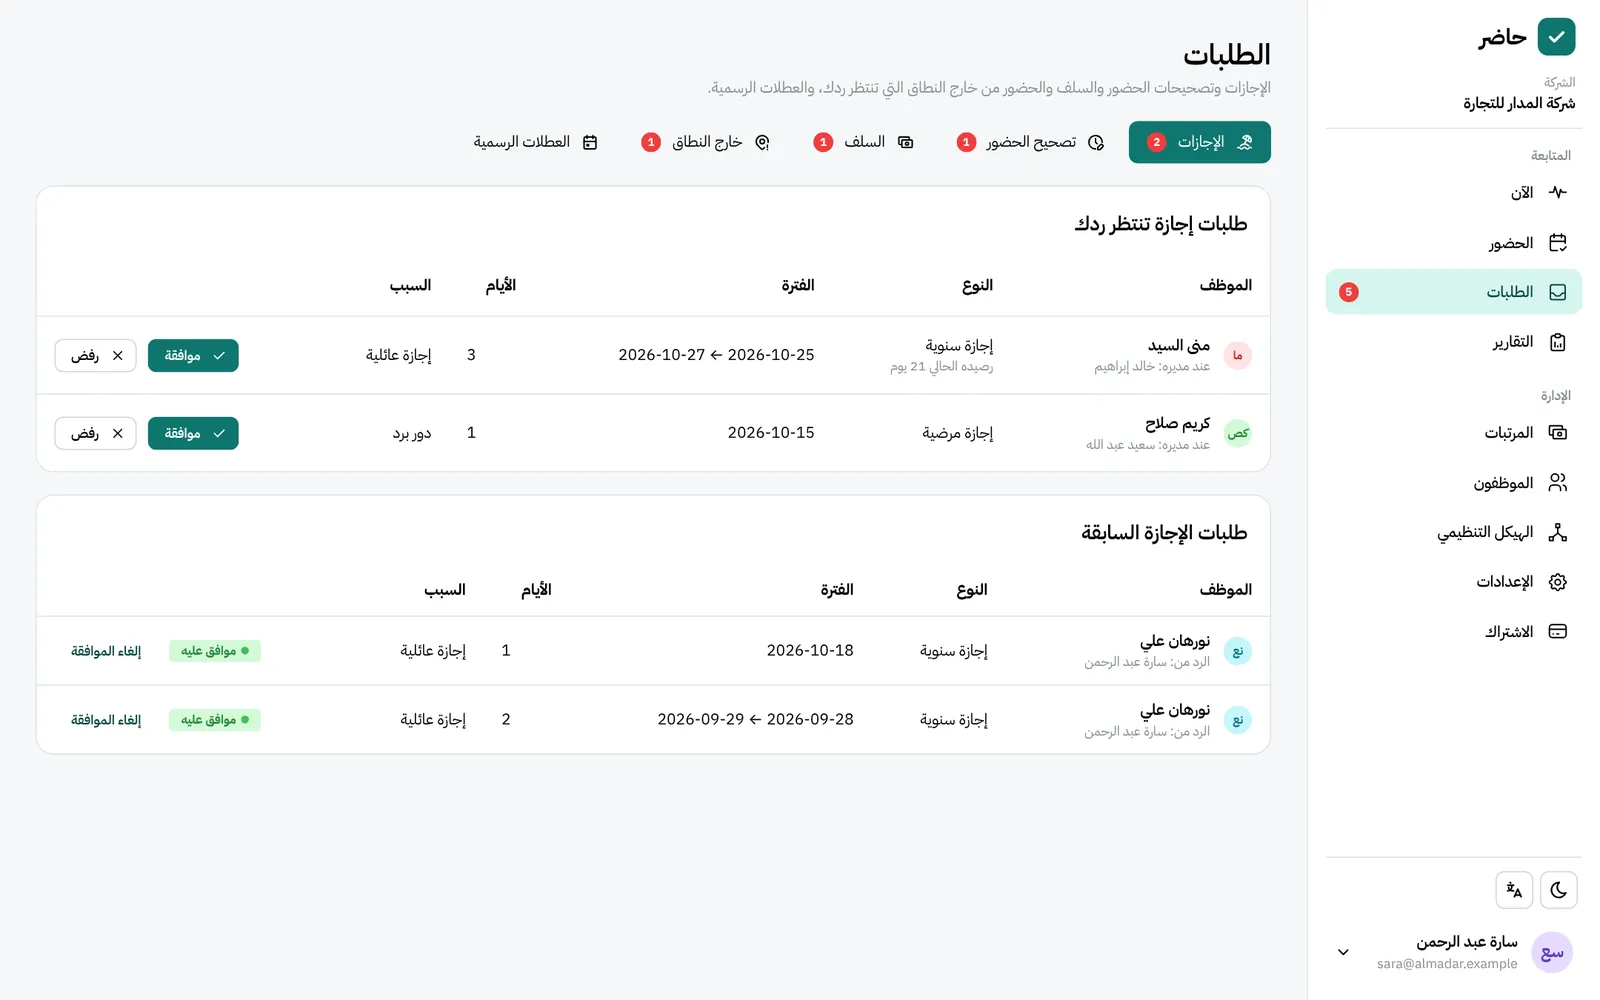
Every request goes to the direct manager first, and HR sees it and can answer too. An approval never goes over the balance or into an approved month.
- Leave types: annual, sick, unpaid, other leave, and permission to arrive late or leave early.
- The annual balance is in working days, for the whole company or per employee. The year is the calendar year.
- Carry-over: what is left from last year carries over up to a maximum you set (default: none), for one year only.
- Public holidays never count as absence and are not taken from the balance.
The “Requests” page lists leave, corrections, advances and check-ins from outside the area, each showing which manager has it. Admins who link Telegram get a message for each request, and the employee gets one with the answer.
| Request | Answered by | Limits |
|---|---|---|
| Leave or permission | Direct manager, then HR | Within the balance, no overlap with other leave, not in an approved month |
| Attendance correction | Direct manager, then HR | Last 60 days, at most 10 open per employee |
| Advance or loan | HR only | At most 3 open |
| Check-in from outside the area | Direct manager or HR | Can’t be rejected in an approved month |
Without a direct manager, or if the manager’s account is inactive, the request goes straight to HR. A manager can’t change an answer HR has given.
09Payroll
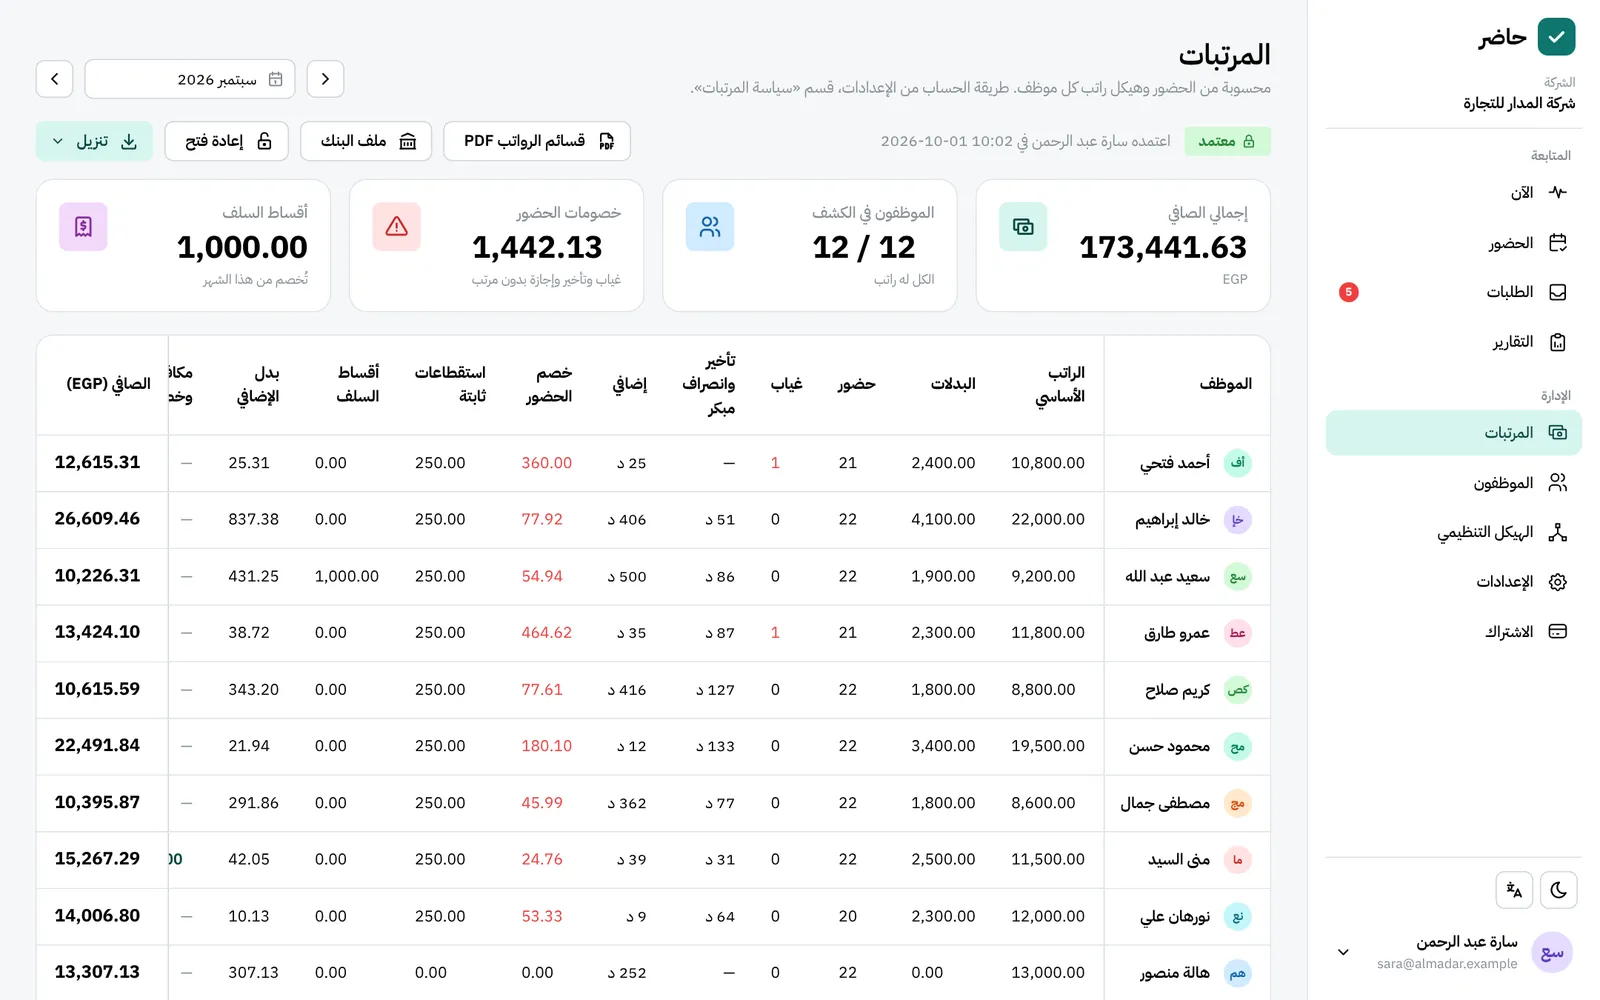
The payroll is worked out automatically from attendance and each employee’s salary structure. Once you approve the month its numbers are fixed, and the payslips and bank file come from them.
The salary structure (set up once):
- Company items: in Settings → “Salary items”, define allowances (housing, transport…) and fixed deductions (medical insurance…). Each item is a fixed monthly amount or a percentage of basic salary.
- Employee items: from the “Salary” button on the Employees page, as an amount or a percentage, from one date to another or open-ended.
- A raise or any change: the “Change from a date” button. Days before that date keep their old value, and an item that starts mid-month counts by its days.
- The day rate for deductions comes from basic salary (default) or from basic plus allowances.
Social insurance and tax are not calculated automatically yet. Record the employee’s insurance share as a fixed deduction.
The monthly cycle:
- 1 Open “Payroll” and pick the month. The sheet shows basic, allowances, overtime, absence and lateness deductions and advance instalments, with each employee’s calculation in detail.
- 2 Add this month’s bonuses and deductions, with notes.
- 3 Review instalments: move one to the end of the schedule, or stop an advance that was paid in cash.
- 4 Approve the month. The numbers are fixed, and that month’s attendance, leave and holidays can’t be changed until you reopen it.
- 5 Download the payslips as PDF (Arabic or English), all in one file or one employee at a time, and the payroll in Excel.
- 6 Download the bank file: it shows the number of employees and the total, and anyone without an IBAN is left out.
Build the bank template once in Settings → “Bank transfer files”: CSV or Excel, encoding, separator, and your bank’s columns in its order. IBANs are checked before saving (29 characters in Egypt, 24 in Saudi Arabia).
10Advances and end of service
Advances and loans: the employee requests one from “My pay” (amount, instalments, first month, reason), or you record it from the Payroll page. Instalments are equal and are deducted every month automatically, shown on the payslip (“advance instalment 2 of 6”). An instalment the net pay can’t cover moves to the end of the schedule.
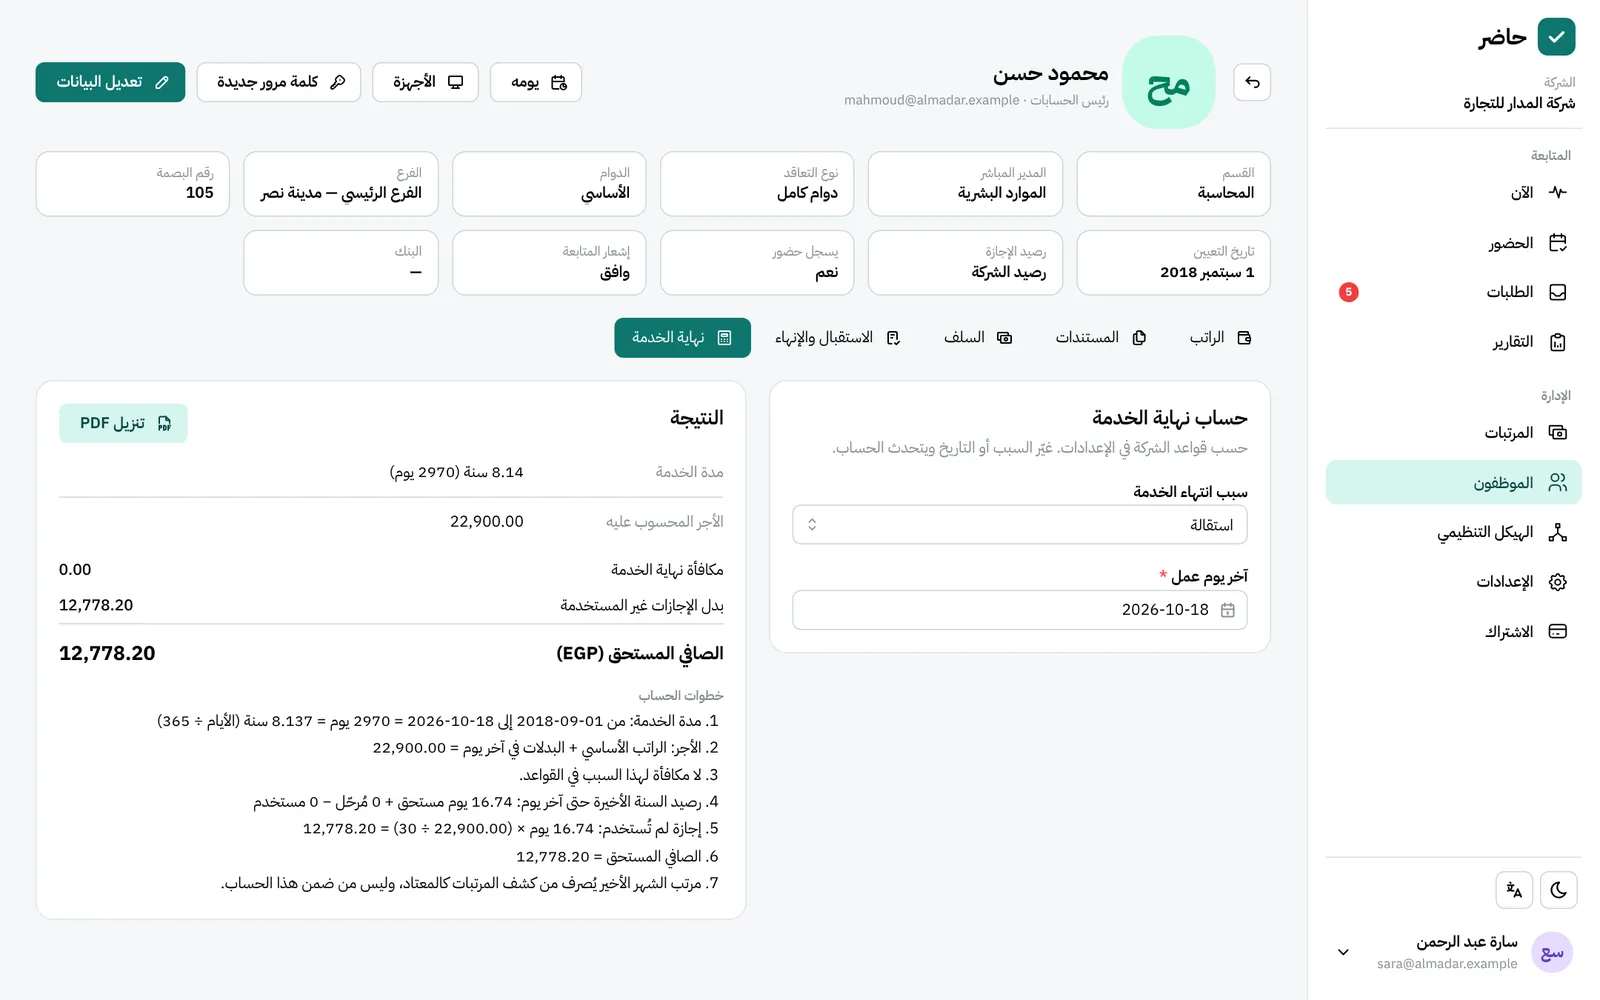
End of service: from the employee’s “Salary” button → “End of service”, choose the reason and the last day. The result: the award, unused leave pay, minus outstanding advances, and the net, with a step-by-step report you can download as PDF.
- The default rules follow the subscription country: Saudi Arabia (Labour Law, articles 84 to 88) and Egypt (Labour Law 14 of 2025).
- Adjust them to your company’s policy in Settings → “End-of-service rules”, and go back to the default with one button.
The rules come from published summaries of the laws, so review them with your legal adviser before relying on them.
11Reports and integration
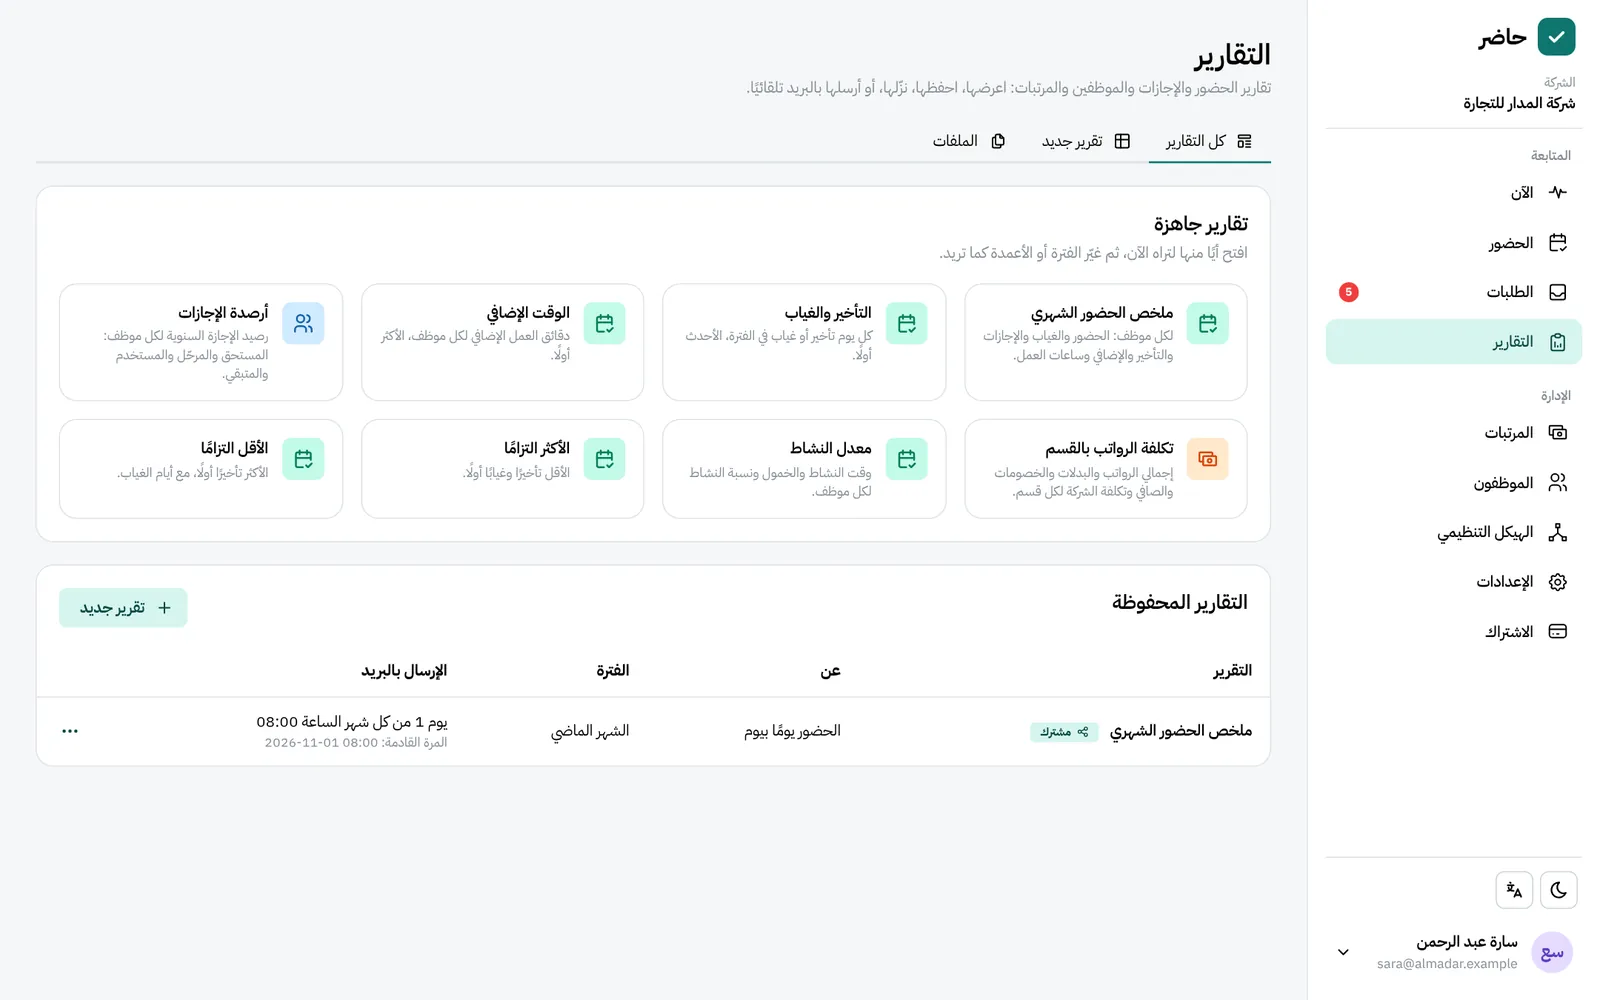
The “Reports” page in the HR app builds any report from four sources and can email it on a schedule.
- Sources: attendance day by day, employees, leave requests, and payroll month by month.
- Period: today, week, month, quarter, year (current or previous), or a date range. The week starts on Saturday.
- Filters: employee, department (and those under it), branch, shift, status, leave type. Then choose columns, grouping (by employee, department, month…) and sorting.
- Ready-made reports you can open and adjust: monthly attendance summary, lateness and absence, overtime, leave balances, payroll cost by department, activity rate, and the most and least punctual.
- Saving and sharing: a saved report is private or shared with every admin in the company.
- Scheduled email: weekly or monthly in the company time zone, Excel or PDF, Arabic or English, up to 10 recipients. The last send result shows next to the schedule.
- Files: up to 3,000 rows download at once; larger ones are prepared in the background and appear under “Files” with a notice. They are deleted after 7 days. A full year’s report for a large company can take tens of seconds.
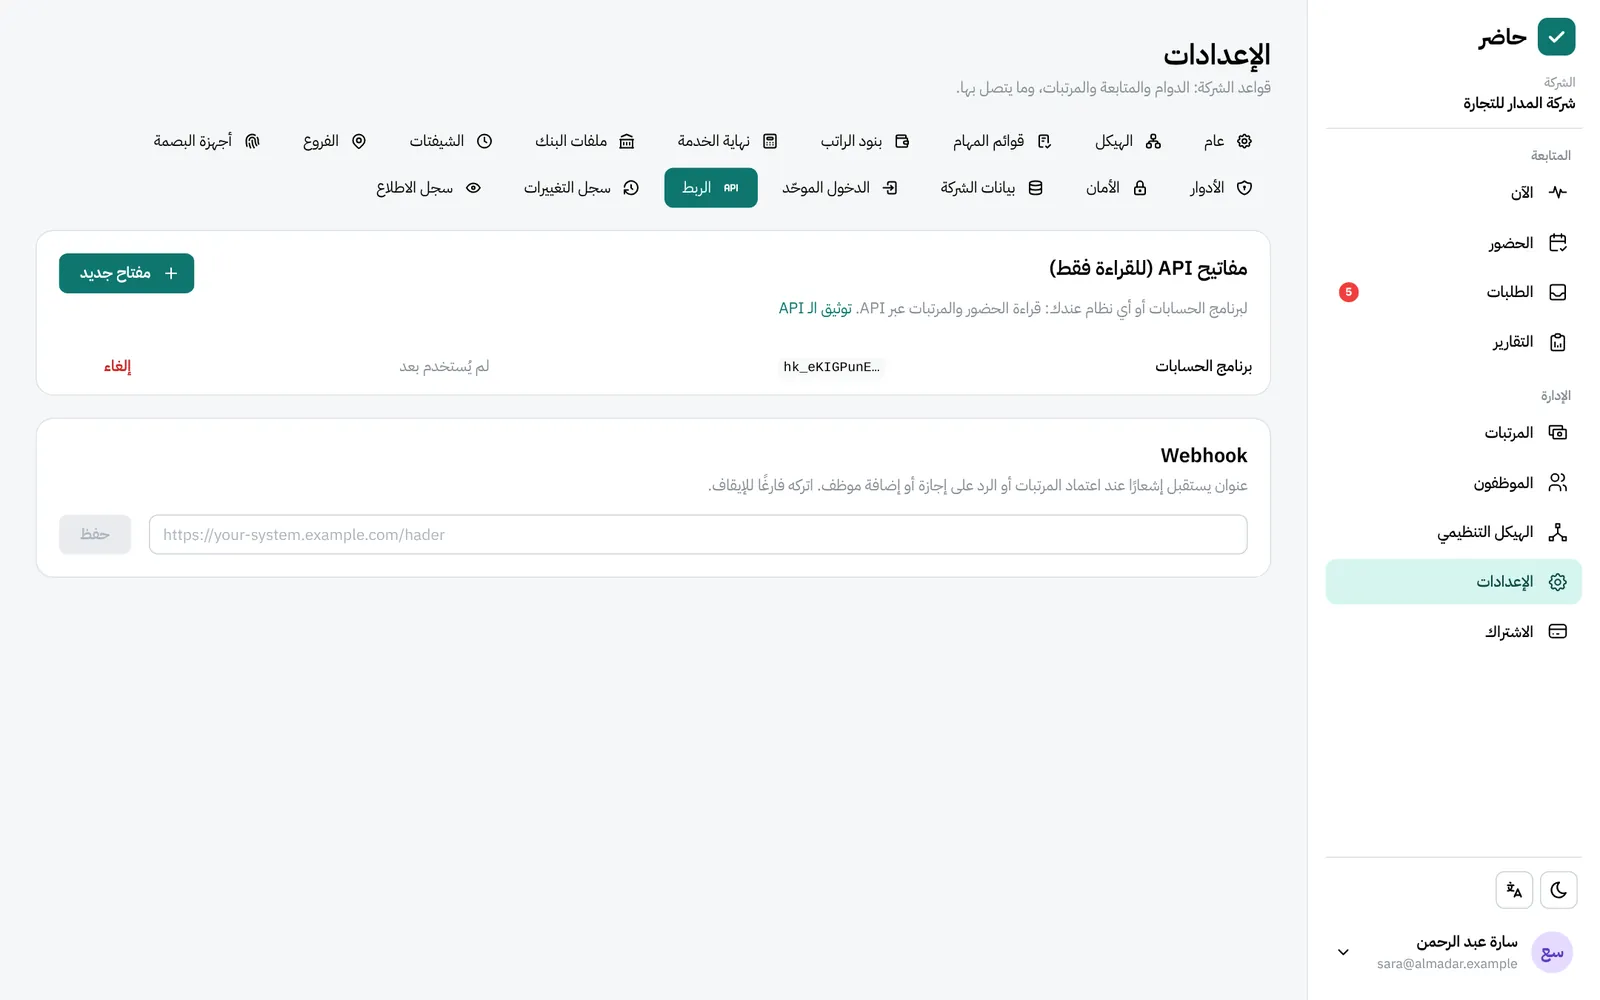
Connecting your accounting software, in Settings → “Connect other software” (full admins only):
- A read-only API key: reads your company’s employees, attendance, summary, payroll and leave, and changes nothing. The limit is 60 requests a minute.
- Documentation in Arabic and English at /api/v1/docs, with ready examples for your developer.
- Webhook: an address that receives a signed notice when payroll is approved or reopened, when leave is approved or rejected, and when an employee is added. A “Test” button sends a sample, and the last 20 notices show with their results.
12Privacy and security
Hader’s server enforces the privacy rules itself, so neither the screens nor the apps can change them:
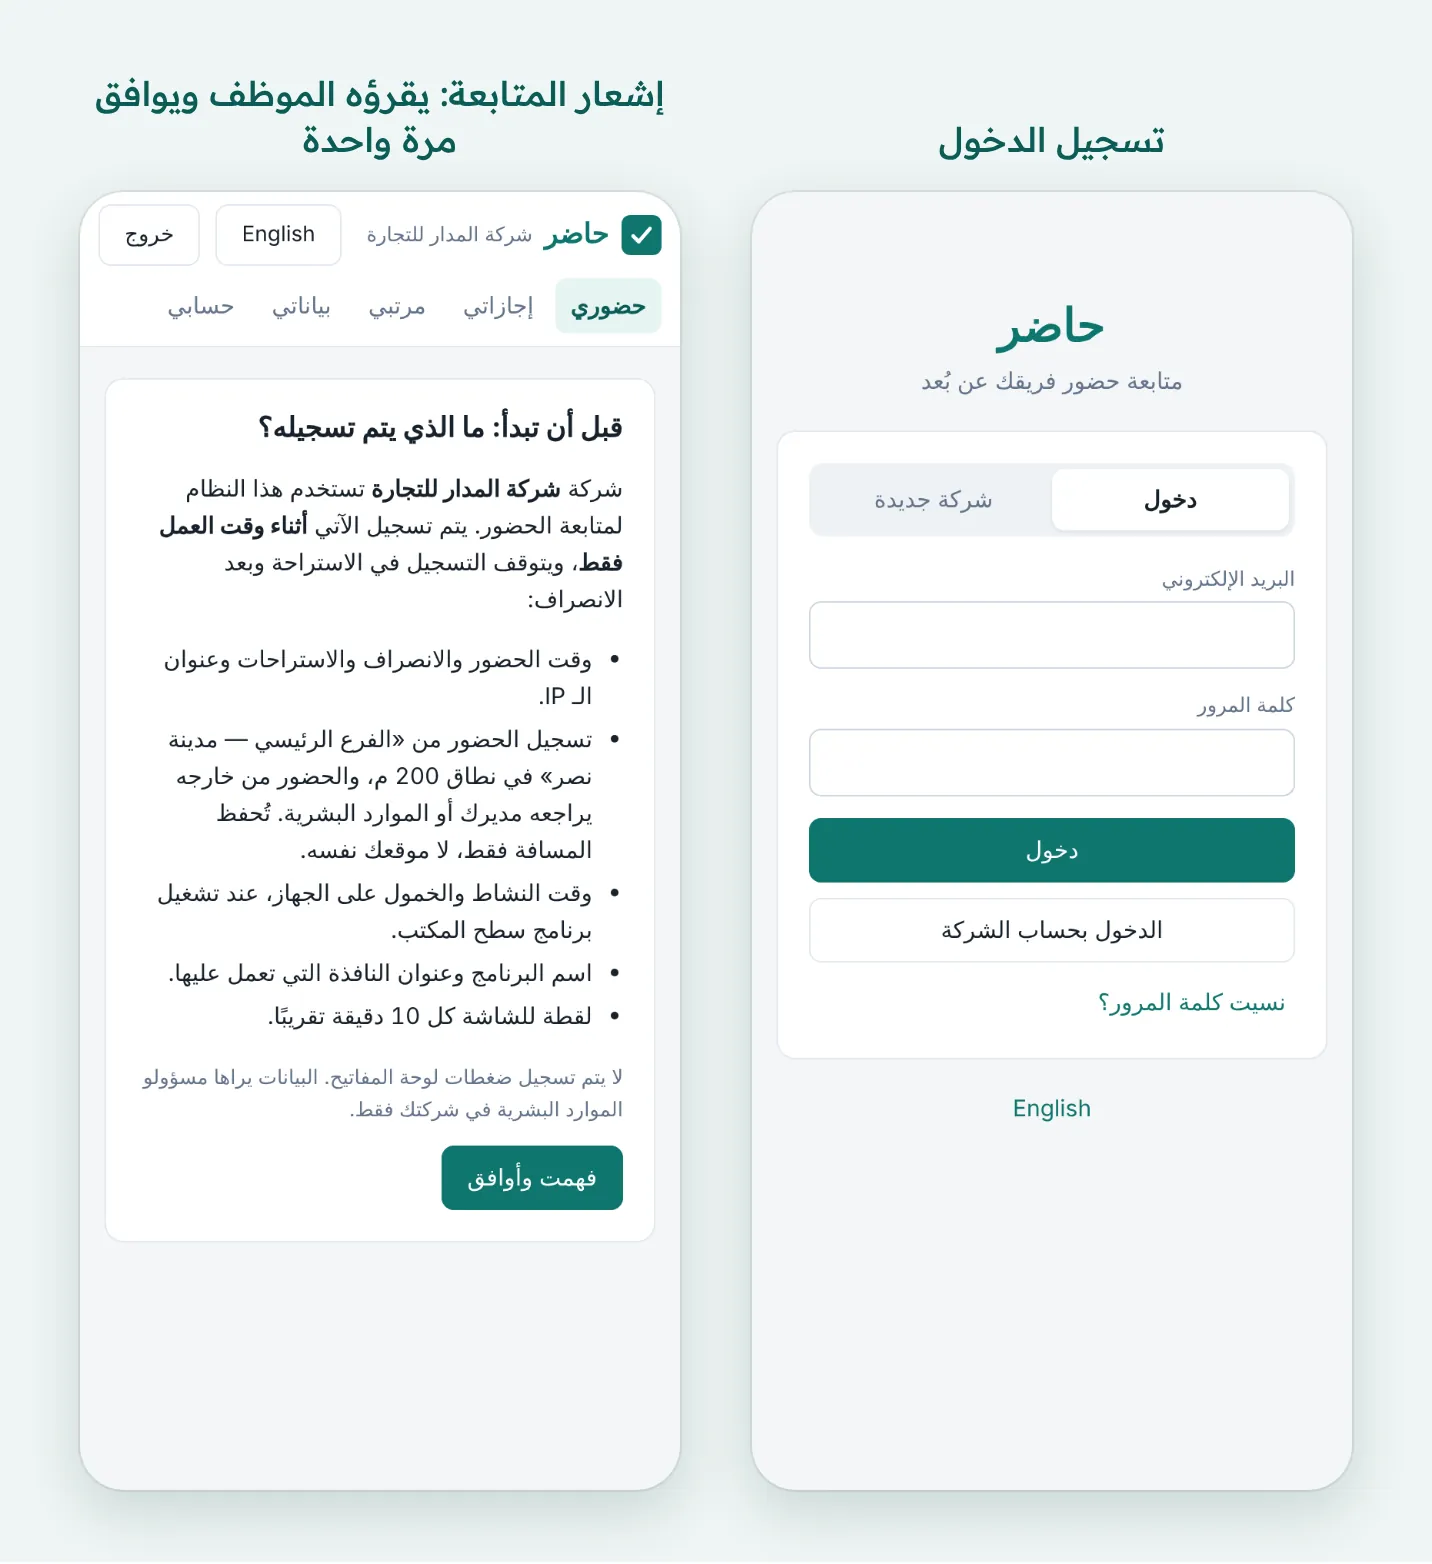
- Activity is stored only for time inside a check-in and outside breaks, and only after the employee accepts the monitoring notice.
- A screenshot is accepted only while the employee is checked in and not on a break.
- The desktop app is always visible next to the clock, and never records keystrokes.
- Employees see everything about themselves that an admin sees, on the “My data” page.
- Screenshots and window titles are deleted after the retention period you choose (30 days by default).
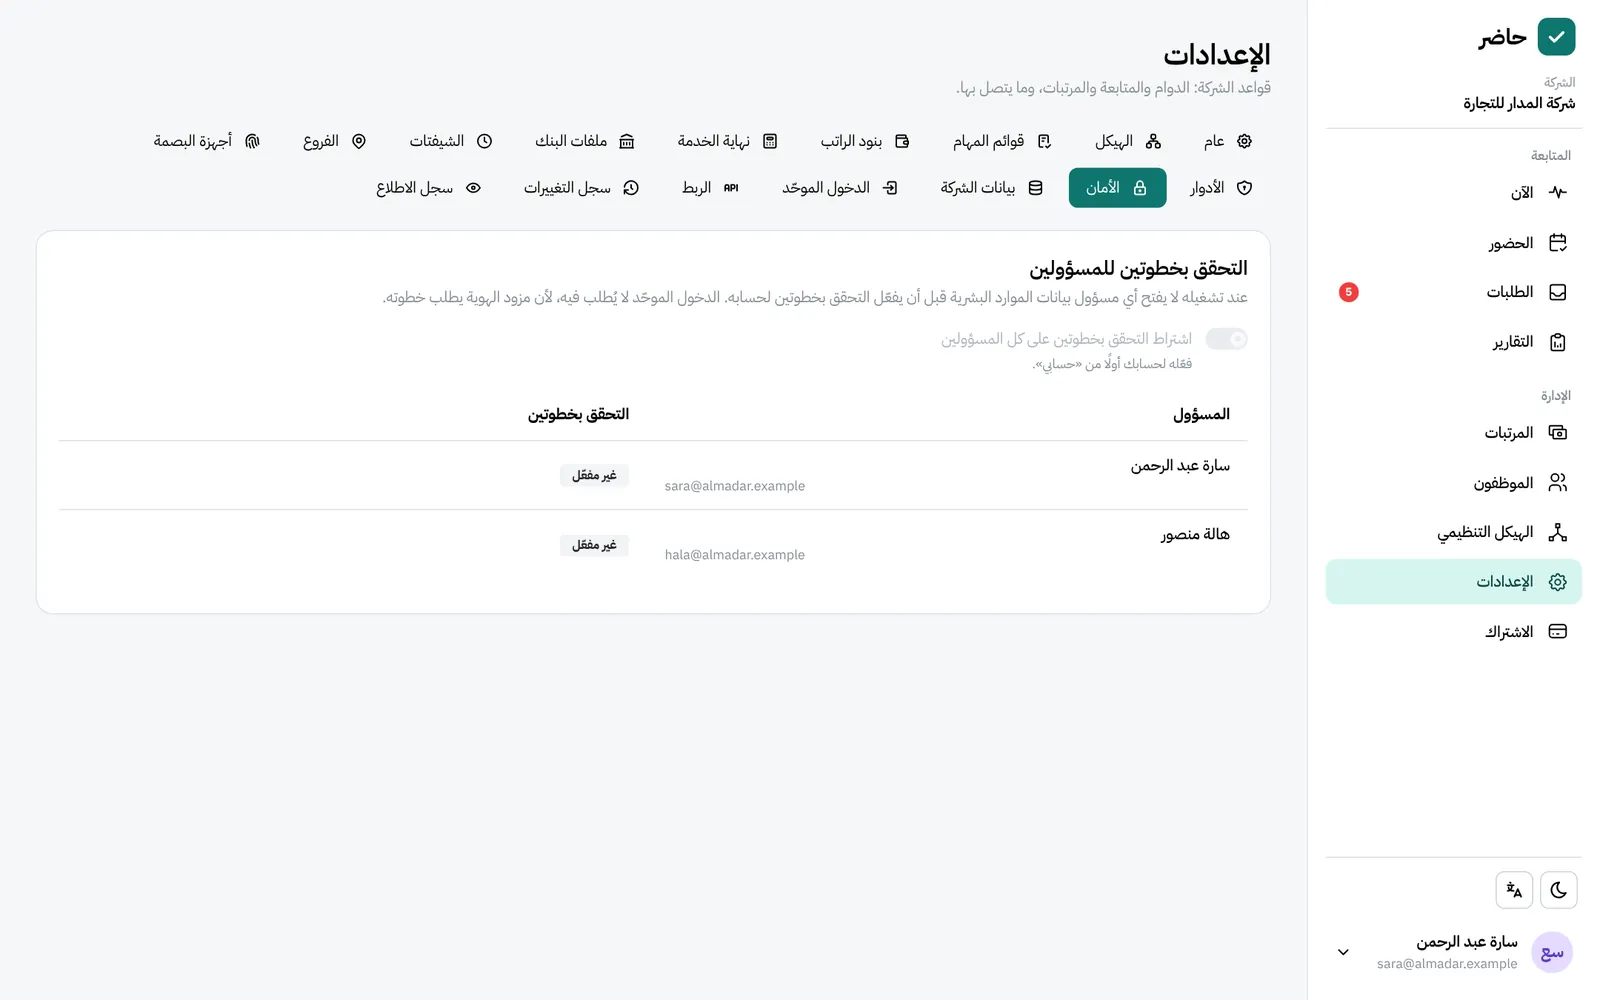
Two-step sign-in for admins:
- 1 In “My account” → “Two-step sign-in”, scan the QR code with an authenticator app (Google Authenticator, Microsoft Authenticator or Authy), then confirm with your password and a code from the app.
- 2 Keep the ten recovery codes somewhere safe. They are shown once, and each works once.
- 3 To require it for every admin: Settings → “Security”. An admin who hasn’t set it up sees only the setup screen.
An admin who lost their phone and codes: another full admin presses “Reset” on the same screen.
Single sign-on (SSO): in the HR app, open Settings → “Single sign-on” and connect Microsoft Entra, Google Workspace or Okta (OpenID Connect), or any SAML 2.0 provider. The page shows the values to enter at the identity provider.
- Employees type their email and press “Sign in with company account”, on the website or in either app.
- No accounts are created automatically: the email must belong to an active account in your company.
- After one successful sign-in you can stop employees from signing in with a password. Admins keep password sign-in in case the provider is down.
Logs and company data:
- “Change log”: who changed what and when, without passwords or salary amounts.
- “Access log”: who read sensitive data (screenshots, documents, salaries, payslips, the bank file), when, and from which address. Kept for 400 days. Employees see who viewed their screen in the last 90 days.
- Company data (full admins, even when the subscription is read-only): download everything as a ZIP file available for 7 days, or request permanent deletion, carried out after 14 days and cancellable until then.
13Subscription and invoices
A new company starts with a free trial, and if a subscription ends no data is lost: the account becomes read-only until it is renewed.
- The “Subscription” page: your plan, how much of its employee and device limits you use, the plans on offer monthly and yearly, and invoice details (legal name, tax number, address). It stays open even after the subscription ends.
- The country sets currency and tax: Egypt in pounds with 14% tax, Saudi Arabia in riyals with 15%. It can be changed during the trial only.
- Paying: choose the plan and billing cycle; an invoice is issued and the payment page opens. If there is no payment button, contact us and we record a bank transfer.
- Renewing and changing: renewing the same plan starts when the paid period ends. Changing plans starts at once, with the unused part of the paid period credited.
- Invoices: listed on the same page, each downloadable as PDF in Arabic or English. Saudi invoices carry the ZATCA QR code (phase one).
If a paid subscription is not renewed:
- 1 Admins get a reminder 3 days before it ends.
- 2 After it ends: 7 days of grace, with everything working, a banner and a “Renew now” button.
- 3 After the grace period: read-only. No new check-ins or changes, but all data is kept and can be viewed and exported.
- 4 Payment brings everything back as it was, and punches that arrived in the meantime become attendance.
The free trial has no grace period. When the desktop device limit is full, disconnect an old device from the “Employees” page to let a new one in.
For employees
14First sign-in and a normal day
Check in with one tap from your phone or computer, or with your fingerprint on the office terminal if there is one.
- 1 Open the Hader link your company sent you and sign in with your email and temporary password, or with “Sign in with company account” if your company uses it.
- 2 Change the temporary password.
- 3 Read the monitoring notice and accept it. It tells you exactly what your company records, and your branch and its area if you have one.
- 4 On a phone: choose “Add to Home Screen” in the browser, and Hader gets an icon like any app.
| When | Button |
|---|---|
| Start of work | “Check in” |
| Breaks | “Break”, then “End break” |
| End of work | “Check out” |
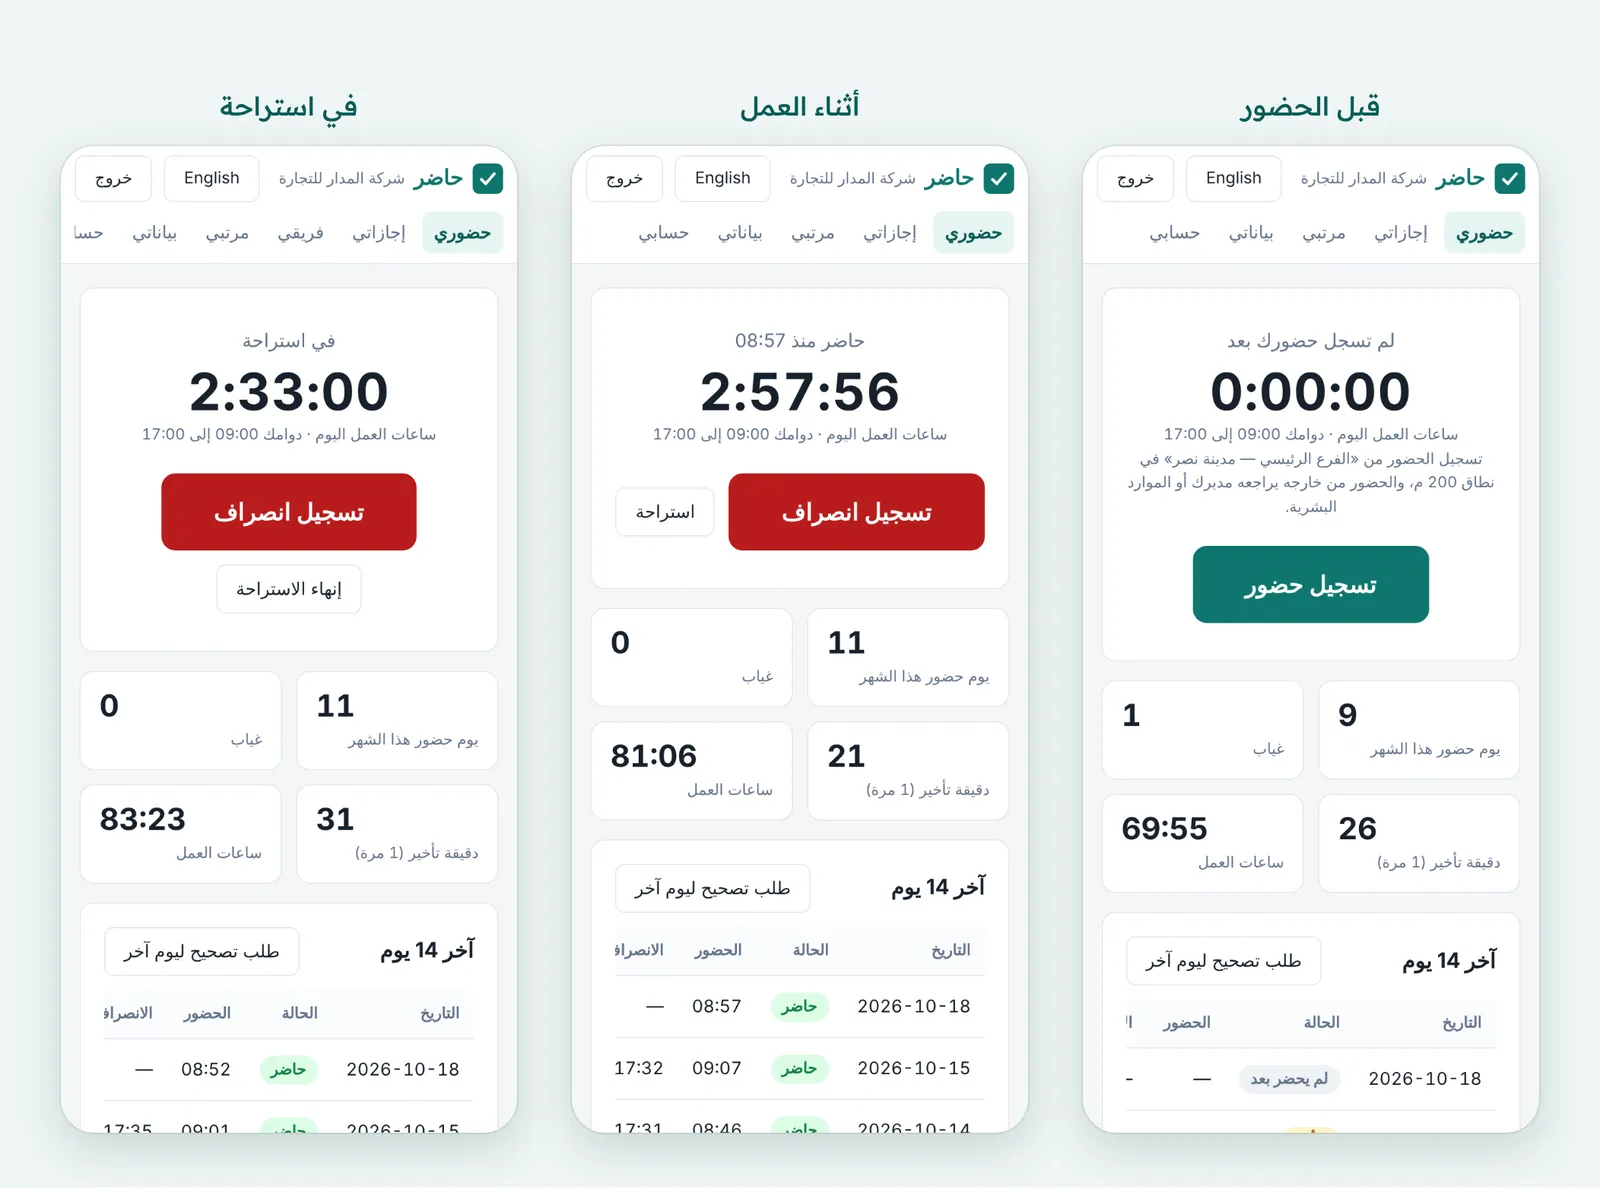
- Location: if you have a branch, the page asks for your location; allow it. From outside the area your check-in may be accepted and sent to your manager for review, or refused with the distance and reason shown. The office network counts as inside the area.
- Night shift: the day counts as the day the shift started, even if you check out after midnight.
- Forgot to check out? The session closes by itself after 16 hours. Request a correction with the right time.
- Telegram: link your account in “My account” to check in and out from Telegram. The bot reminds you 5 minutes after your shift starts if you haven’t checked in. The bot writes in Arabic.
15The desktop app
A small Windows app next to the clock: you check in from it, and it measures working time if your company turns that on. It records nothing outside a check-in or during a break. The app is in Arabic.
- 1 Download the app with the download button on your page on the Hader website, and run the file.
- 2 Windows may show “Windows protected your PC” because the app is not digitally signed yet: press “More info”, then “Run anyway”.
- 3 Sign in with your email and password, or with your company account. The password is never stored on the computer.
- 4 If you haven’t accepted the monitoring notice yet, the big button opens your page so you can read and accept it there.
After the first sign-in the app starts with Windows as an icon only; you can turn that off from the icon’s menu.
The window above the clock shows your status, today’s working hours, the check-in or check-out button, the break button, and exactly what is recorded. The icon’s colour tells your status:
| Colour | Status |
|---|---|
| Green | Checked in |
| Blue | On a break |
| Grey | Not checked in |
| Red | No connection, or the notice not accepted |
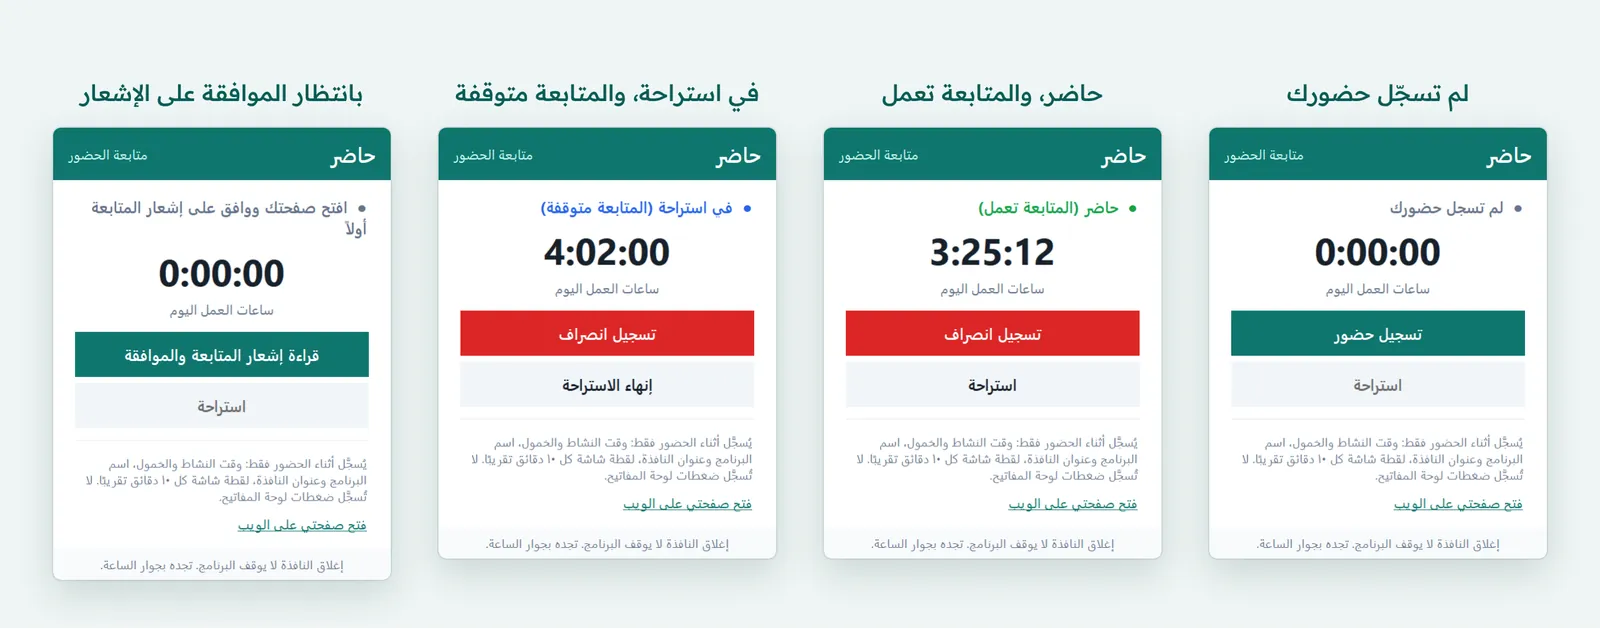
- The X button only hides the window; the app keeps running next to the clock. Click the icon to open it, or right-click for the same buttons.
- Starting the app again shows the open window instead of a second copy.
- Recorded (as your company chooses): active and idle time, app names and window titles, and screenshots at random times (about every 10 minutes by default).
- Never recorded: keystrokes, and anything before check-in, after check-out or during a break.
- If the internet drops: activity is kept on your computer and sent when the connection returns, and nothing counts twice.
- You see everything recorded about you, and who viewed your screen, on the “My data” page.
16My leave, my pay, my data
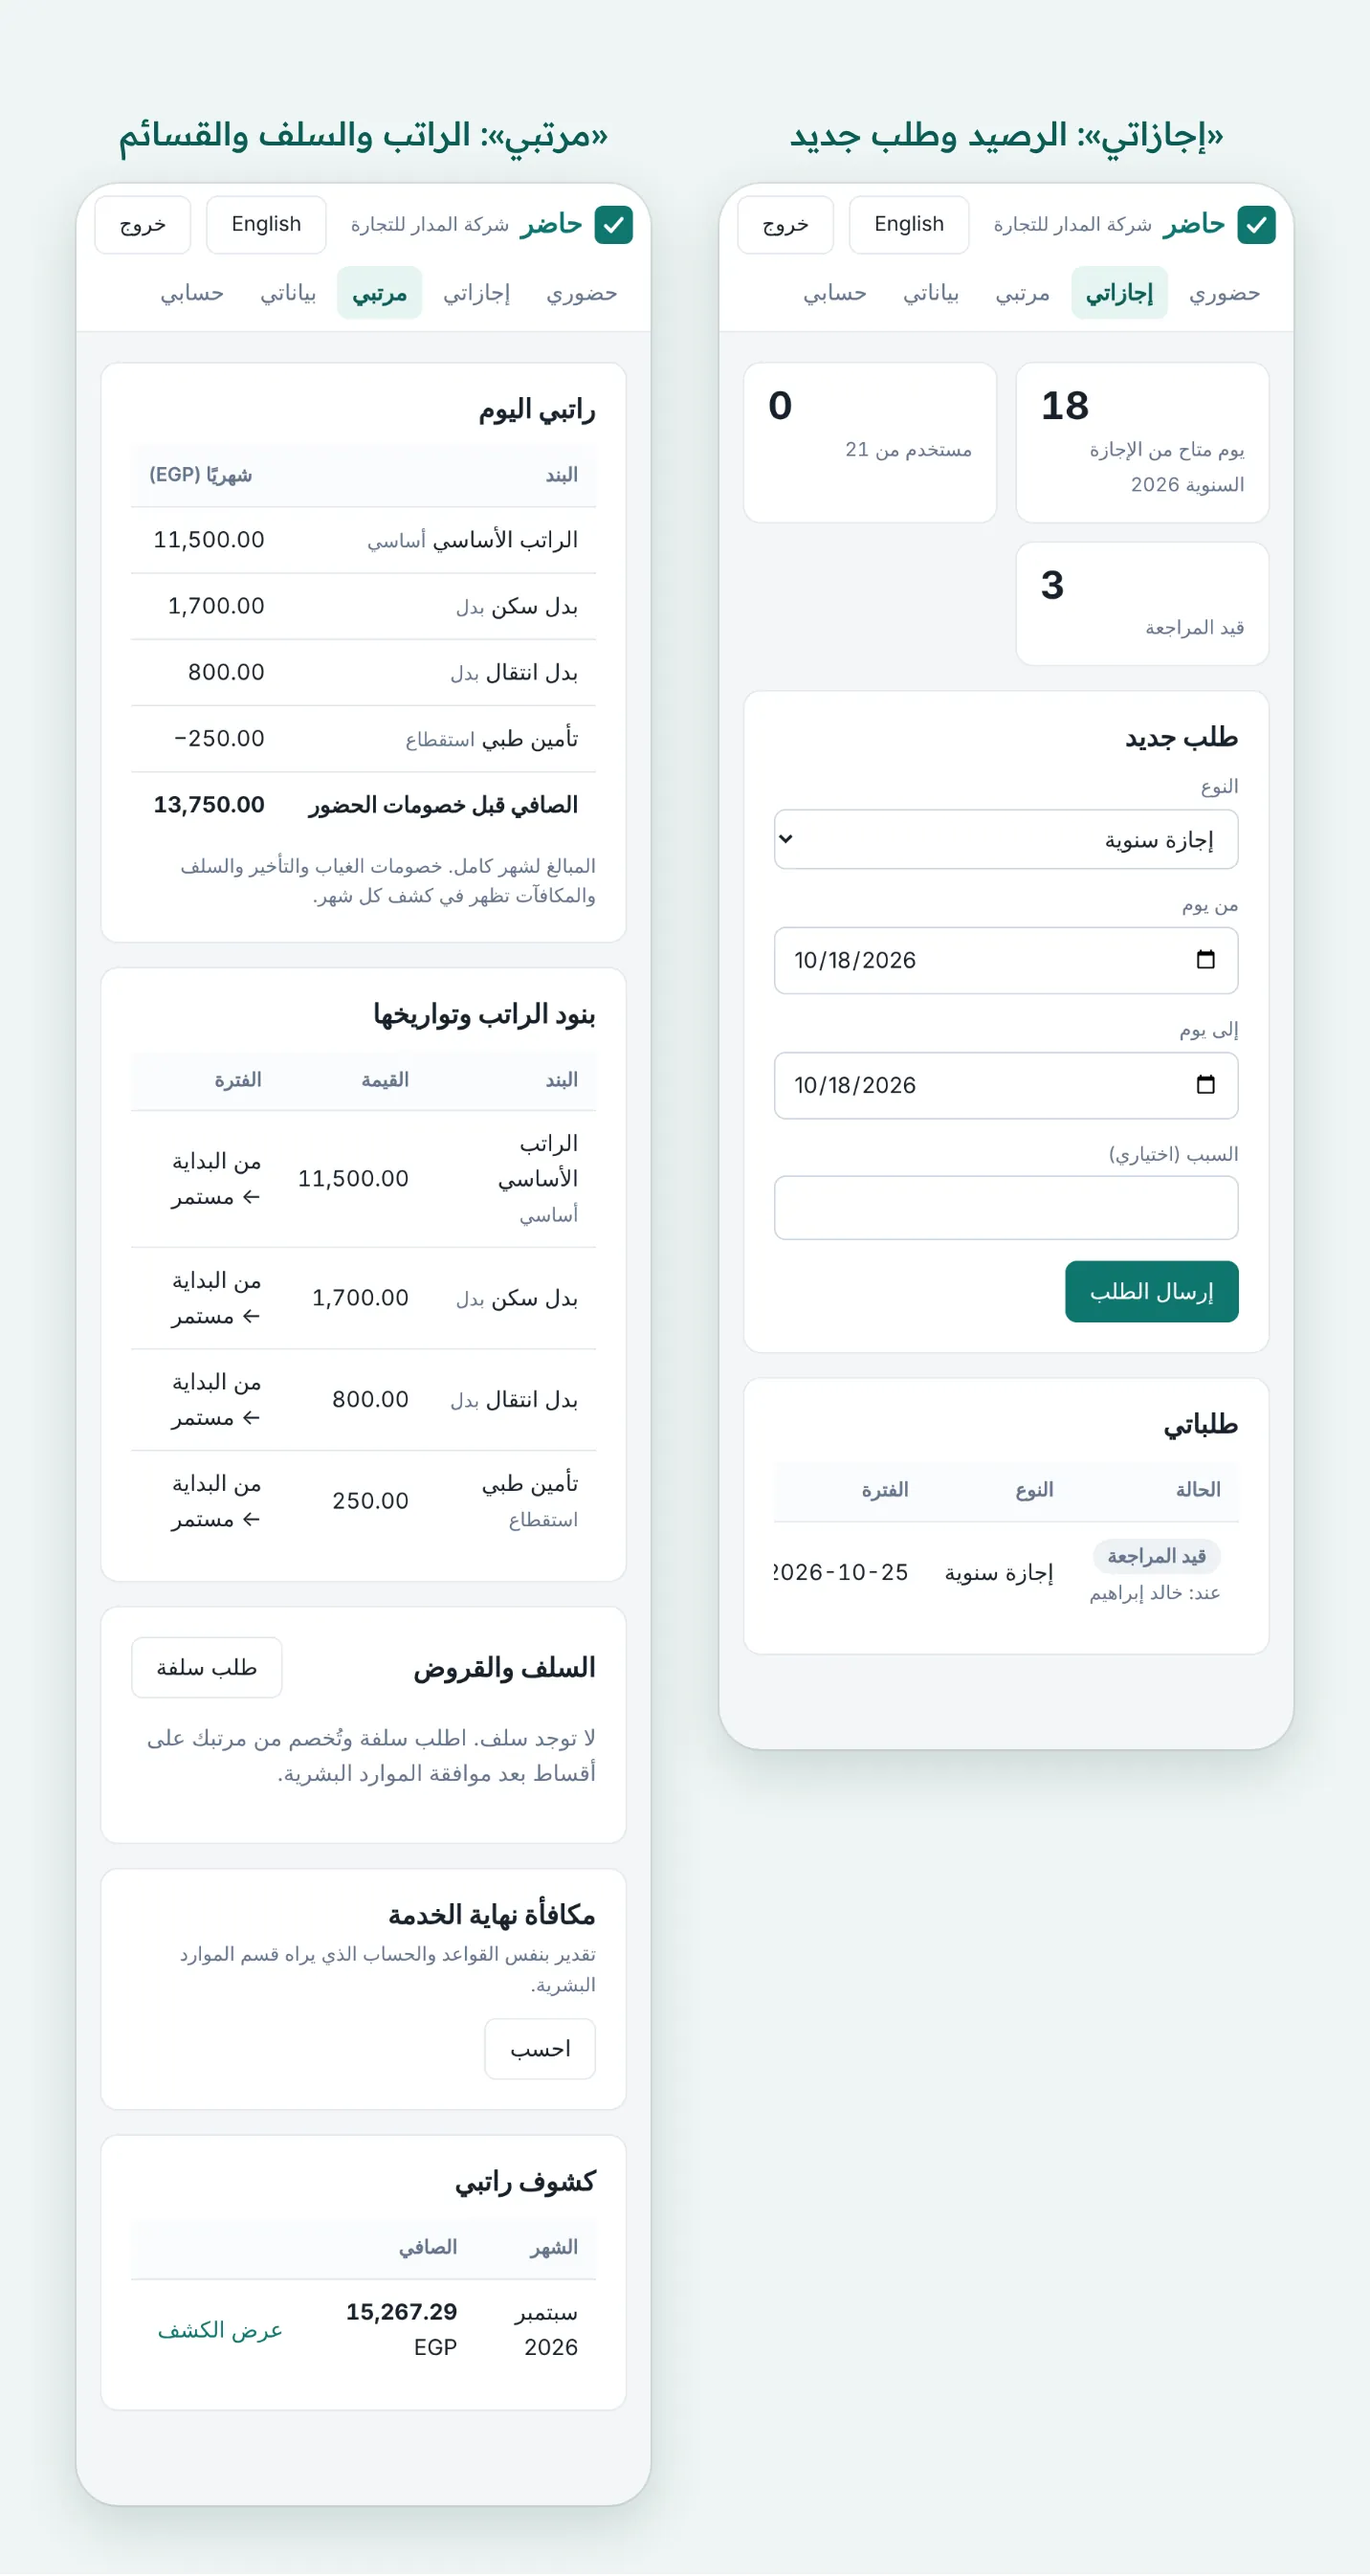
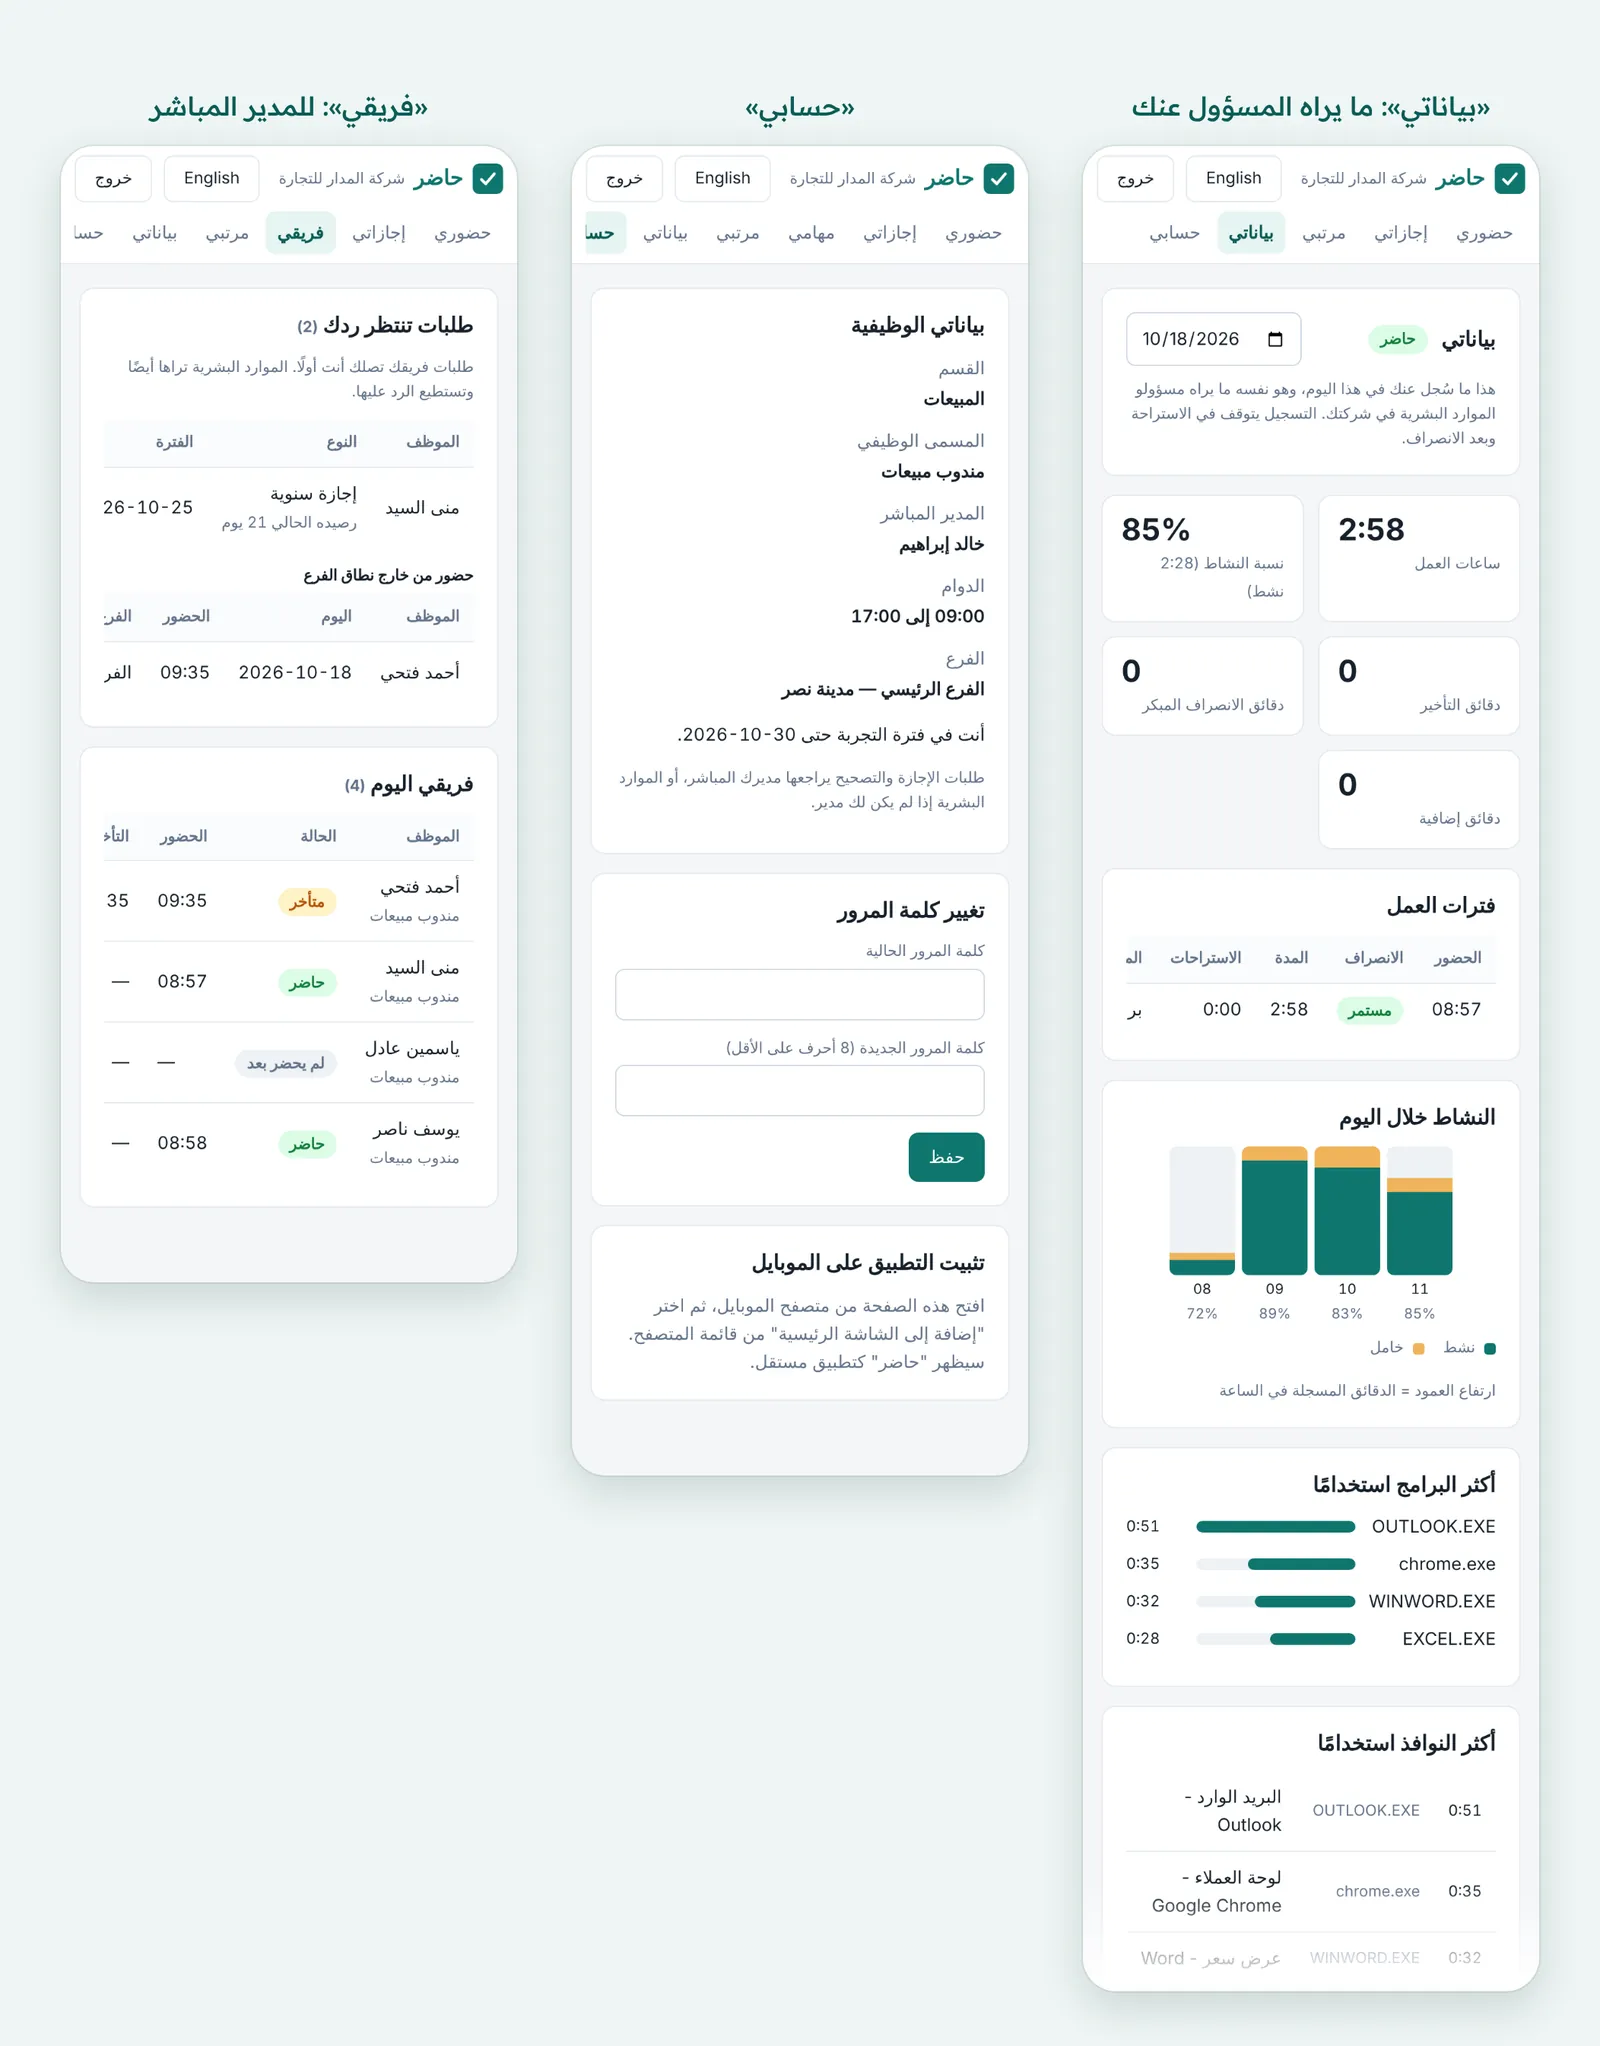
Everything about you is on five pages, and every request shows who has it and who answered.
| Page | What is on it |
|---|---|
| “My attendance” | Check in, check out and breaks, the last 14 days, and a correction request for any day |
| “My leave” | Your leave balance, leave or permission requests, and past requests with who has them |
| “My pay” | Your salary structure and its dates, PDF payslips for approved months, advance requests and their instalments, and an end-of-service estimate |
| “My data” | Your days, activity and screenshots as an admin sees them, your documents, and who viewed your screen |
| “My account” | Your department, job title and manager, the end of your probation, your password, and the Telegram link |
- A leave request can’t go over your balance. It goes to your direct manager, or to HR if you have none.
- A correction request covers the last 60 days, from “My attendance”: click “Request correction” next to the day or “Request a correction for another day”, then enter the right time and the reason; approval fixes your day automatically.
- An advance: amount, number of instalments, first month and reason. HR answers it.
- Payslips appear only after the month is approved, in the language of the screen.
If people report to you: the “My team” page lists their requests and their check-ins from outside the area for you to approve or reject. “My tasks” lists the onboarding or offboarding tasks assigned to you.
Reference
17FAQ and troubleshooting
| Problem | Fix |
|---|---|
| “Change your temporary password first” | Choose a new password, then the other pages open |
| I forgot my password | “Forgot your password?” if email is set up; otherwise ask your company admin for a temporary one |
| Sign-in stopped after wrong attempts | Wait a quarter of an hour, then try again |
| My check-in was refused or sent “for review” | Let the browser know your location and be inside the branch area, or connect to the office network |
| “Windows protected your PC” | “More info”, then “Run anyway” |
| The app’s icon is red | Check the internet, or open the window and accept the monitoring notice |
| “Your company has reached its limit of desktop devices” | The admin disconnects an unused device from the “Employees” page, or upgrades the plan |
| “The account is read-only” | The company’s subscription has ended. Data is kept, and renewing restores everything |
| I can’t change attendance or leave in a past month | The month is approved. Reopen its payroll first |
| I can’t add an employee | The plan is full: upgrade it from the “Subscription” page |
| No Telegram messages | Link your account in “My account” |
For any problem with the desktop app: choose “فتح ملف السجل” (open the log file) from the icon’s menu and send it to support with a description of what happened.
18Contact and support
Employees contact their company admin first; admins contact us directly.
- WhatsApp: +20 101 452 2566
- Email: info@fadx.ae
| Office | Address | Phone |
|---|---|---|
| United Arab Emirates | Al Muraqqabat, Deira, Dubai | +971 50 381 8923 |
| Saudi Arabia | Asir Region, Muhayil Governorate | +966 55 913 0767 |
| Egypt | Sila Mall, Al Nagda Square, 6th of October City | +20 101 452 2566 |
When asking for support, give the company name, the page or app, and the exact message you saw. Never send your password: we will never ask for it.
Still need help?
Send us your question and we will reply with the steps.